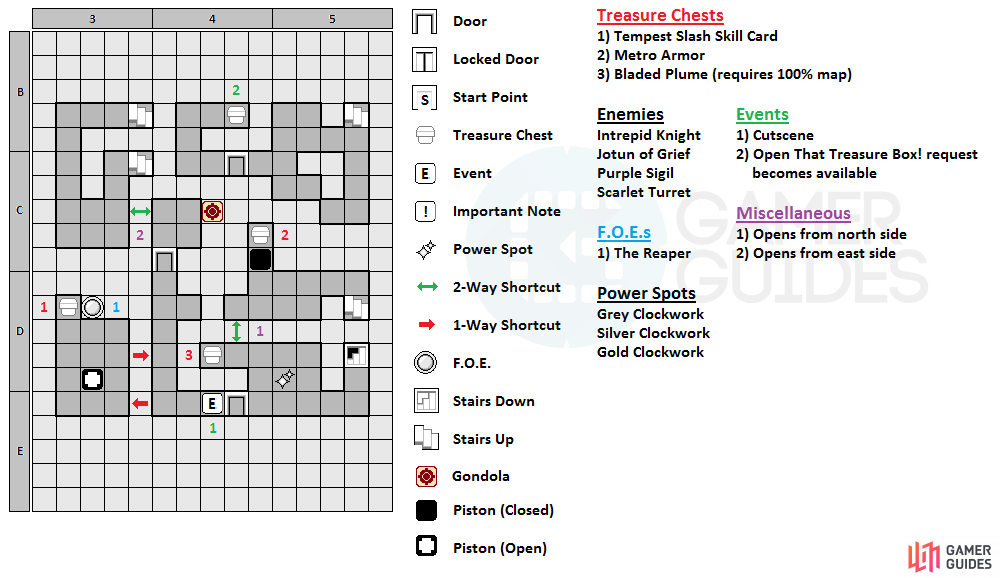
The map for the sixth floor of Clock Tower.
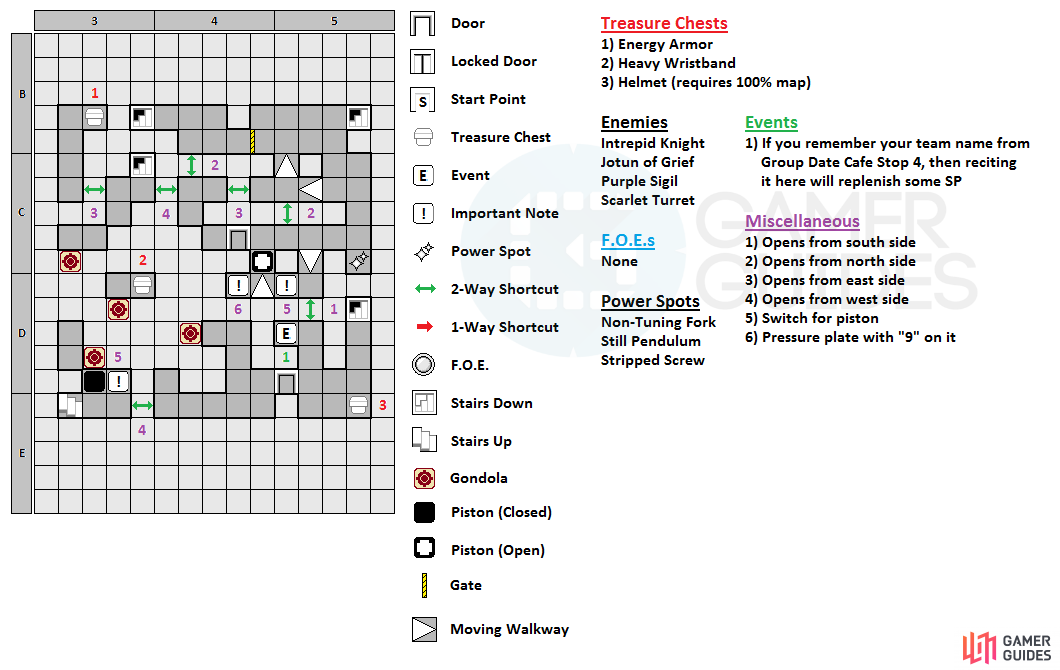
The map for the seventh floor of Clock Tower.
| Enemy Name | Weak | Resist | Null |
|---|---|---|---|
| Intrepid Knight | Wind, Light | Cut, Bash | Dark |
| Jotun of Grief | Elec | Bash, Stab, Ice | -- |
| Purple Sigil | Fire | Ice, Elec, Wind, Light, Dark | -- |
| Scarlet Turret | Ice | Cut, Stab, Fire, Wind | -- |
The sixth floor of the Clock Tower will introduce a new thing that will occur on later, which are the Gondolas and they will be talked about shortly. For now, head into the first area to find a Power Spot and the 100% map chest ( Bladed Plume accessory). Go through the door and you’ll view a cutscene, so once it ends, you might see a shortcut straight ahead. This is a one-way shortcut and it leads into a small room with The Reaper, who is guarding a treasure chest ( Tempest Slash Skill Card ). Unfortunately, you won’t be able to get the chest at the moment, due to the piston in the room up on the floor above.
If you do happen to go into the room with The Reaper, there’s another one-way shortcut two tiles above where you enter that leads back into the hallway you came from. There’s a little dead end just before the door, but it’s nothing but a “dead end” event. When you head through the door, you’ll see something there that the others will call a gondola, which will basically let you ride to another part of the floor. For now, the gondola here will transport you to the east, where you’l be able to find some stairs that lead to the seventh floor. Before you do that, though, go west from the stairs and through the door to find a locked chest that will make the Open That Treasure Box! request available in the Nurse’s Office.
Take those stairs and you should now be in the upper right corner of the 7th floor, with a gate to your west, a Watcher FOE to your south and a Power Spot in the southeast corner of this area. To progress, go south to the wall and step onto the moving walkway that goes west, then open the shortcut to the west before taking the other shortcut going south. The door to your west only leads to a single tile, which will be useful later. For now, though, step onto the moving walkway going south and hit the switch on the wall to bring the piston up from the sixth floor. This will allow you to reach the pressure plate (9 steps) to the west, so step on it and hit the piston switch again.
It’s best to avoid the room with The Reaper, as you can’t get the item in it until you reach the 7th floor (left). The gondolas are one-way rides (right) across gaps in the floor, allowing you to reach new areas.
Step back west onto the moving walkway, then go east one step and north through the shortcut. Go north onto the moving walkway, then west through the gate. Make sure you open the shortcut here before using the stairs to return to the 6th floor. Now, as you go south, the Reaper will be coming after you, but don’t mind it and just keep going until you get to a clearing (you won’t have to get into a battle with the Reaper). From here, go east, open the shortcut, move around a bit to make the Reaper move back to its initial spot, then go back through and up the other set of stairs to the 7th floor. Open the shortcut back to the east, then go through the one to the west to find a treasure chest ( Energy Armor ).
Head all the way back to the northeast stairs on the 7th floor and take them back down to the 6th. The gondola should still be over this side (if it isn’t, then you’ll have to get to this floor from the fifth), but you’re going to come at it from the north so you can ride it south. You should see a piston here, which is preventing you from getting the chest, but you’ll be getting it shortly. Open the shortcut to the south before going up the stairs and back to the 7th floor. The 100% map chest for the 7th floor will be directly to the south ( Helmet accessory). Go west and north to find another shortcut, as well as an event where you will need to remember the team name you chose from Group Date Cafe. If you do remember it right, then your SP will be replenished some.
If you want to get the treasure that was blocked by a piston on the sixth floor, then take the shortcut north, hit the switch to bring the piston to the 7th floor, then go back through the shortcut and use the stairs to go down ( Metro Armor ). When you’re ready to continue, go back to the 7th floor and enter the door to your west. There’s nothing to the south (well, a shortcut that opens from the west), so go to the north and you’ll find a gondola. Ride it west, then take the other one back east and go around to the north, riding the same one south, east and lastly north.
Retrace your steps to get back to where the piston is located, then go through the door and ride the gondola to the west. Continue with riding the next gondola south, then the next one east, which will bring you back to the southern area. Now, you have to go back to the northern of the two sets of moving walkways and take the two shortcuts going west. From here, you can ride the gondola to the south to find a treasure chest ( Heavy Wristband ) and the next gondola south to the stairs leading to the 8th floor and a piston.


 Sign up
No Comments