| Enemy Name | Weak | Resist | Null |
|---|---|---|---|
| Amorous Snake | Fire, Dark | Ice, Wind | -- |
| Blind Cupid | Wind, Dark | Fire | -- |
| Elegant Mother | Light, Dark | -- | -- |
| Gorgeous King | Fire | Light, Dark | -- |
| Idle Basalt | Elec, Light | Cut, Stab | -- |
| Natural Dancer | Ice, Light | -- | -- |
| Vehement Idol | Ice, Dark | -- | -- |
| Whimsical Papillon | Wind, Light | -- | -- |
| Wondrous Magus | Elec, Dark | Fire, Ice, Wind | -- |
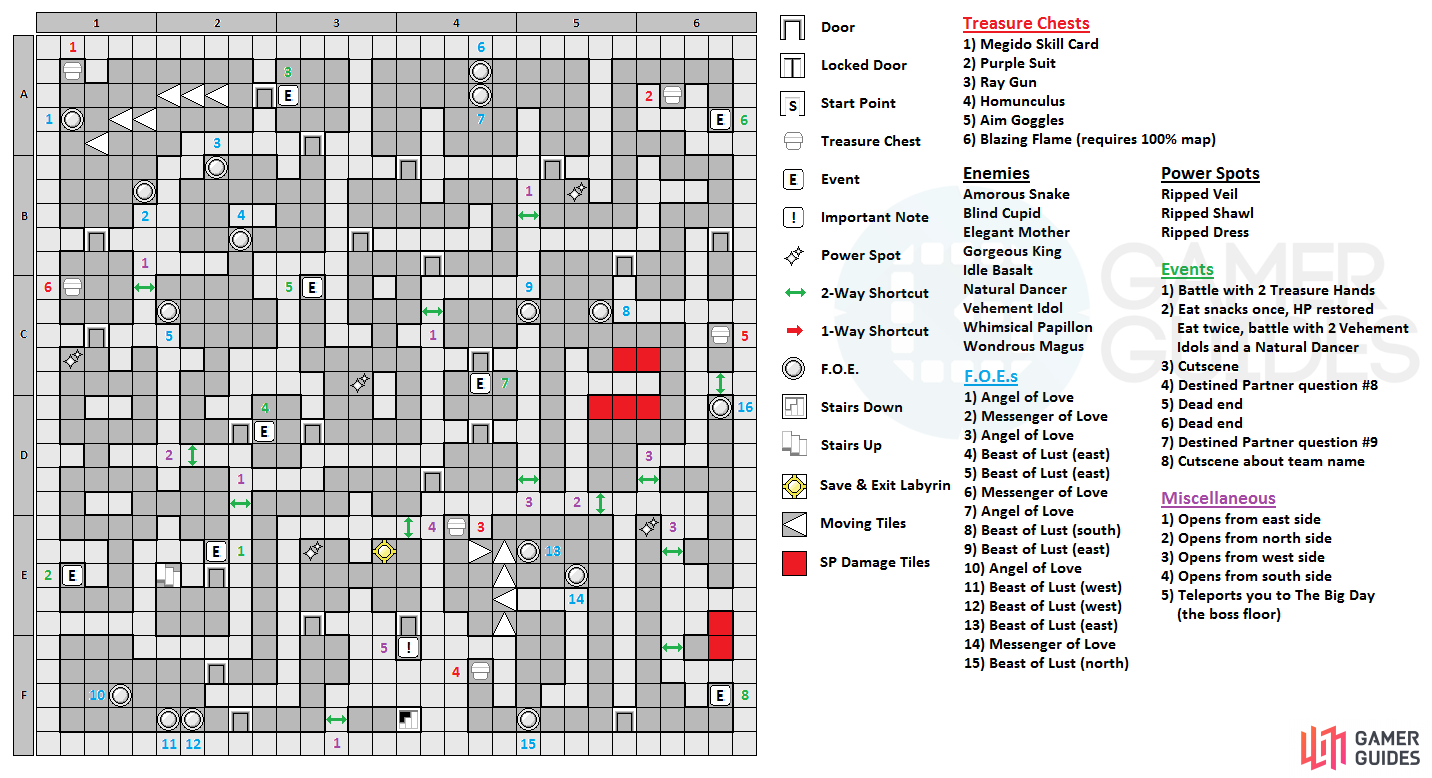
Going through the first door will have you battling two Treasure Hands, which are the rare Shadows in this labyrinth (you likely ran into a couple so far). You should know what to do, but if you don’t, it’s best to use Agility Bind or Panic on them, keeping them from running and even dodging your attacks. After the fight, go west and south to find a dead end with some snacks. Eat them once to restore some HP, but diving in a second time will have you fighting a battle with a Natural Dancer and two Vehement Idols. Now, go north, looting the Power Spot right next to the door, then go through it to find a small room with the 100% map chest ( Blazing Flame ).
As you’ll soon notice, there are two different FOEs here, the Messenger of Love and the Angel of Love. While the Messenger isn’t too bad, the Angel is annoying because you move towards it if it hits you with an arrow. North of the Angel FOE is a chest that contains a Megido Skill Card and the door to the next area is to the east, where you’ll see a lengthy cutscene. In the room after that, there will be two more FOEs, the Angel of Love and the Beast of Lust blocking the southern route to more of the dungeon. Simply move the Beast to the east one tile, then go around and head south to find another Beast.
You will need to lure one of the Beasts of Lust to stand in the line of sight of an Angel of Love, so you can head down the path to continue the dungeon.
The problem here is that if you continue south, the Angel of Love FOE will hit you with an arrow and draw you back north. So, lure the Beast of Lust to the east to block the Angel’s line of sight, then continue south and through the next door to answer Destined Partner Question #8 . In the next room will be a Power Spot and the dead end is just a dead end, so go north to find two doors. Both of the doors lead to the same exact spot, with nothing being different about either one. Beyond that, you’ll find the two FOEs that shoot you with arrows that move in opposite directions, so you’ll likely need to time your steps to avoid one while getting in the path of the other (it will be facing the opposite direction, though).
Go through the next door and you’ll find another Power Spot, as well as a shortcut near it that heads back to a previously visited area. At the fork, go north to find a treasure chest that has a Purple Suit inside (the dead end just beyond that is a dead end). Head down the other path you came across, ignore the first door (dead end where you can see a chest) and go through the next one. Two more FOEs are here and you’re faced with another choice, as sneaking past the south one will lead to treasures, while the western one guards the path deeper into the dungeon.
Past the southern FOE, you’ll see some of those spiked tiles from the first floor, so be careful not to walk on those and continue south. There will be two shortcuts here, one going east and another south, so take the southern one for now to appear in another area with two FOEs. Two of the chests are in this area, so you’ll need to maneuver the Beast of Lust nearby to the east at least one tile, then go to where it was location to spot another one to the south. Move this one to the north three spots, then sneak by the Messenger of Love and go south.
Ignore the door for now and go west, past where the FOE in the south originally was to find the first chest, which contains a Homunculus . Now, take the closest path that goes north, which should not be blocked by the FOE and step onto the moving walkway, allowing you to grab the chest ( Ray Gun ) in the northwest corner. Remember that door you passed just a bit ago? Go back there and go through it, then to the southeast corner, where you’ll get an event to create a team name. Although it doesn’t have any impact on the story, it can be used in a later labyrinth in an event (nothing major or anything).
While not terribly important, you will be able to get an item in a later dungeon if you remember your team name.
Head north along the long corridor to find two shortcuts, as well as a Power Spot at the end of the path. Now, you remember that chest you saw but couldn’t get before? There’s a FOE guarding it, so open the southern of the two, then go back and take the north shortcut. Lure the FOE to the south, but make sure you don’t block yourself in, then go back and lure it the rest of the way via the southern shortcut (spiked tiles here). That should free it up to where you can grab the chest, which contains the Aim Goggles accessory.
Return back to where it was mentioned that going west would continue further into the dungeon and take that route. To get past the FOE there, you’ll have to move the eastern FOE south two spots, then you can move the other one east two to get past it. Open the shortcut before going through the door to answer Destined Partner Question #9 . Keep going past that, opening any shortcuts you find, until you come to a room with an Angel of Love FOE, as well as two Beasts of Lust, who are guarding the exit. Keeping an eye on the Angel’s movements, lure the first Beast as far west as you can, then move the second one a single tile.
Move past them and enter the final area, which houses a Power Spot, as well as one of those golden gears that you can save your game and/or exit the dungeon. Go through the final door to get one last Destined Partner Question , then you’ll fall down with your destined partner to the final floor. There will be some dialog as you venture north here, but it’s a straight shot to the boss!
BOSS: Merciful Clergyman
This boss tends to use a lot of status ailments, like Silent Song, Binding Cry and Pulinpa (Panic one person), as well as its unique skill, Vow. What this skill does is prohibit the use of one of your actions, with each one corresponding to the color for your actions. Blue is Leader Skills, red is Attack, yellow is Skills and green is Item. If you should happen to use one of these when its corresponding coffin is up, the boss will retaliate with Holy Wrath, which inflicts damage, as well Magic, Strength and Agility Bind on whoever breaks the vow.
The boss will only nix one command at the beginning, but later on in the fight, it will get rid of two commands.
Besides that attack, the boss also knows Hard Slash and Heat Wave, two physical attacks, so you’re free to bring anyone you want into the battle, since you don’t have to worry about elemental weaknesses. Thus, the entirety of the battle is more about managing the ailments, as well as not using any of the banned actions. Luckily, unlike the previous boss, Clergyman is weak to electricity, making characters like P4 Protagonist and others who can use electric skills a great help.
Also, the boss doesn’t have a resistance to poison, which will greatly deplete his health each turn, in addition to your normal damage. If you’re having trouble inflicting it, then make sure you have Impure Reach on the Persona with the poison skill. When the boss gets to around 50% health, it will begin to ban two actions with each casting of Vow instead of one. This will limit your actions even further, but work around it and defeat the boss.


 Sign up
No Comments