| Enemy Name | Weak | Resist | Null |
|---|---|---|---|
| Autonomic Basalt | Elec, Light | -- | -- |
| Lustful Snake | Fire, Light | Elec, Wind | -- |
| Possessive Cupid | Wind, Dark | -- | -- |
| Spurious Book | Ice, Dark | -- | -- |
| Tranquil Idol | Ice, Light | Fire, Elec, Wind | -- |
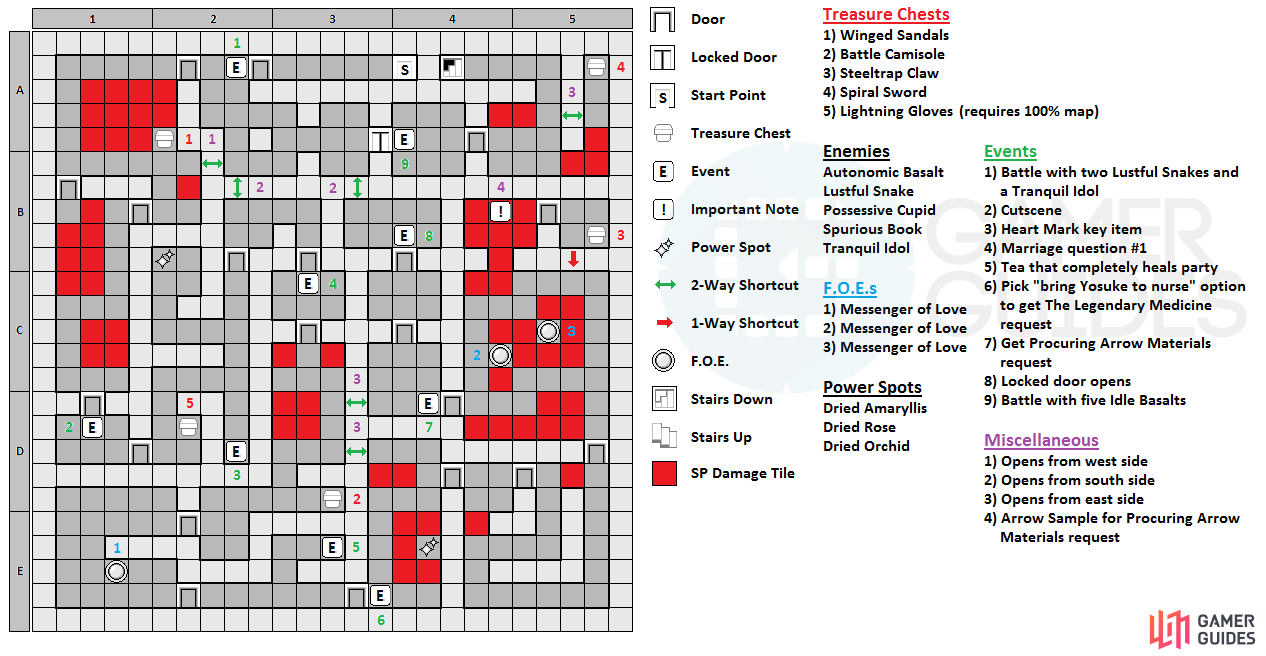
You’ll hear a mechanical voice when you first enter this labyrinth, which will mention about meeting your “destined partner.” Ignore that for now and go straight to the first door, where you’ll be warned about some Shadows (fight with 2 Lustful Snakes and a single Tranquil Idol). The southern path leads to a door that is locked, so go through the other door and you’ll come to some funny-looking tiles with spikes on them. If you choose to walk on them (you will need to get 100% map), they will drain your SP. It’s better to avoid walking on them for now and walk around to open the chest, which contains the Winged Sandals item.
There’s two doors in this room, one in the southwest corner and another in the southern section, both leading to the same room. However, the southwest door will have you surrounded by the SP damage tiles, so take the other one. Go south, avoiding the spiked tiles and through the next door, where you’ll view a short cutscene. Continue through the next door, where you’ll spot the 100% map chest ( Lightning Gloves ). Past that will be a dead end to the south, where you’ll get the Heart Mark key item (the second of the four items for Zen’s weapon).
The spikes will drain your SP when you walk on them (left). The Winged Sandals item will allow you to walk on them without getting hurt (right).
Keep going north now and take the west detour to find a Power Spot, then go through the next door, opening the shortcut just north of the door. When you enter the next room, you’ll be asked your first Destined Partner question , which is tied to the overall wedding event for this labyrinth.
After answering the question, the chains will be removed and you can continue. Move past the spiked floor tiles and go east to find a chest ( Battle Camisole ), then west through the door. You’ll be introduced to the first FOE of this labyrinth, the Messenger of Love. As you find out, it does nothing but spin around as you walk, but should you cross into its line of sight, it will shoot an arrow at you, causing your controls to be reversed. Time your movements to get past the FOE when it’s not looking your way and head into the next area.
Head to the dead end to find some tea and should you choose to drink it, your party’s HP and SP will replenish some. As you go into the next room, you’ll be presented with a choice regarding Yosuke; choose to take him to the Nurse’s Office later to make the Legendary Medicine request available. After that’s over with, you’ll spot a Power Spot in the room, but it’s surrounded by some spiked tiles, so either walk on them if you want or use a Winged Sandals item if you have it. In the next room, there’s two spiked tiles place at certain points and if you want to avoid them, you’ll have to take a long way around; it’s best to go straight from where you enter to avoid unnecessary fighting.
There will be two FOEs in the next room, as well as more spiked tiles. The goal is to get to the southwest corner of the room, but there’s a chest to the north. The bad thing is that you’ll be forced to walk on the spiked floor to get to the room with the chest, which contains a weapon for Teddie ( Steeltrap Claw ). Should you go for it, there’s a one-way shortcut that leads back to the room with the FOEs right next to the chest. When you go through the door in the southwest, you’ll see a short scene and the Procuring Arrow Materials request will become available in the Nurse’s Office.
The Messenger of Love will fire arrows whenever you get in their line of sight (left). For the Procuring Arrow Materials request, you can find the item needed at the point shown on the right.
Make sure you open the shortcut nearby, then head through the north door for Destined Partner Question #2 . Answer the question, then go through the next door to hear a noise. This is the locked door from earlier unlocking, so use the shortcut in the northwest corner of the room to be right outside of the door. Before you head through it, though, be prepared for a challenging battle, as you will be fighting 5 Idle Basalts. These enemies can use Stona on a party member, which makes it so they can’t perform any actions and this ailment persists between battles. The good thing is that they’re weak to electricity (also light), so using someone like Zen in the battle or someone else with Mazio will help immensely.
Go through the next door and you’ll see two paths, one to the north that leads to the stairs for the next floor, and another to the east, which has spiked tiles and leads to a treasure chest ( Spiral Sword ). When you’re ready to continue, use the stairs to go to the second floor.


 Sign up
No Comments