| Enemy Name | Weak | Resist | Null |
|---|---|---|---|
| Bribed Fuzz | Wind | Stab | -- |
| Black Raven | Elec | Cut, Wind | -- |
| Change Relic | Ice | Cut, Stab, Fire, Wind | -- |
| Devious Maya | Light | Bash | Dark |
| Phantom Mage | Fire | Wind, Dark | -- |
| Phantom Master | Fire | Wind, Dark | -- |
| Rainy Brother 2 | Elec, Light, Dark | -- | -- |
| Rainy Pot | Fire | Wind | -- |
| Trance Twins | Wind | -- | -- |
As soon as you step foot onto the floor, you’ll see a short scene and after that’s finished, head to the Velvet Room to unlock a new option. This is Skill Card Extraction and it basically sacrifices a Persona to get one of its skills onto a Skill Card, letting any of the other characters learn without that Persona being equipped (sans Zen/Rei). Some Personas will have the skill available right away, while others might require you to level them up some to get to the skill that can be extracted.
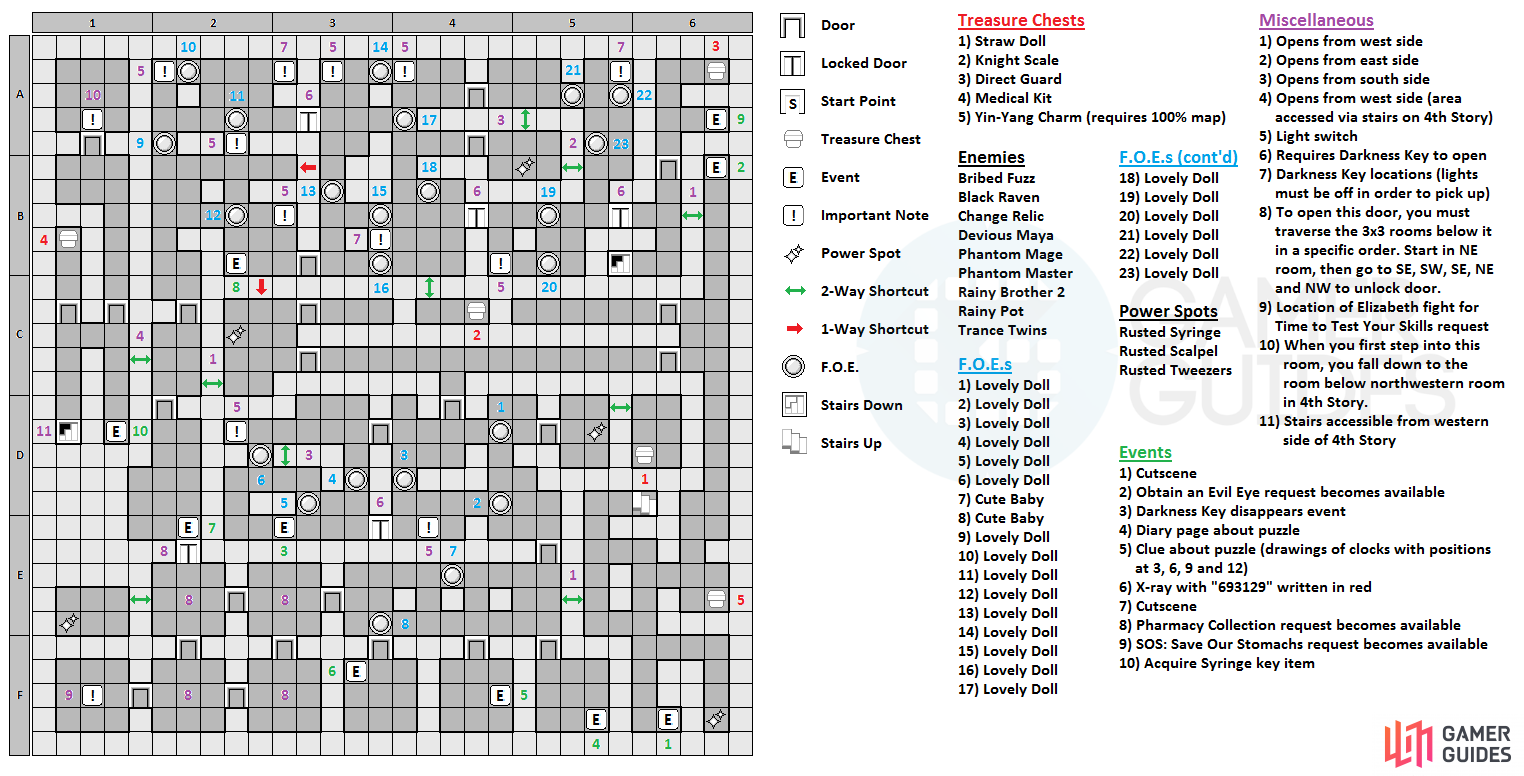
In the first area of this floor, go south to find a dead end with a cutscene, as well as another dead end with a Power Spot. North of that will be the 100% map chest ( Yin-Yang Charm key item , which unlocks all of the stat switching accessories) and the door to go further. Go all the way north to get the Obtain an Evil Eye request from the dead end, then go through the southern of the two doors to the south of that (the north one is a small corridor with nothing in it). This will be another long hallway here, with a door on the west end, which has a Power Spot and another door leading to nothing.
Return to the long hallway and take the door leading to the south in the middle, which leads to a dark area with some Lovely Doll FOEs. For now, go through the door to the west and to the far end of the room to find a light switch. With the lights on, you are free to move around this room without worrying about FOEs. Start off by opening the shortcut nearby, then go to the southern end of the room, where you’ll find a key. The problem is that the key keeps disappearing when you pick it up, and Yukiko gives a clue to get to the key without creating any shadows.
Head back to the light switch and turn the lights off, then use the shortcut to get back to where the Darkness Key was located. With it in hand, go straight east to the locked door and open it, allowing you to get into the southern section of the dark room you first entered. Turn on the light switch nearby, then go through the door in the northeast, where you’ll see a Power Spot and a shortcut that leads to another small room with a treasure chest ( Straw Doll ). Return and go through the southeast exit, leading to a long room with three doors along the southern side. All three lead to 3x3 rooms with clues about the puzzle you’ll encounter on this floor, which will actually be coming up in the very next room.
You need the lights on in order to pick up the Darkness Key and use it to unlock any doors that use it.
The problem with the long room is that there are two Cute Baby FOEs in it, one in the north and one in the south, with their trigger points being just north of the easternmost pillar and the other point being the middle (on the south side) between the second and third doors. So, you’ll have to go south past the first pillar, then north past the second and third ones. As already mentioned, in the next room is the main puzzle on this floor, which is split into four 3x3 rooms, with you starting in the northeast one. From there, go south one room, then west, back east, north and west to unlock the door leading north. Note that there’s an empty room in the southwest, as well as another accessed via a shortcut west of the room with the locked door, which houses a Power Spot.
With the puzzle now out of the way (there’s a cutscene right past the locked door, with the P4 one being rather nice), go north until you hit another dark area with Doll FOEs and light switches. There is a switch in the middle of this area, so flip it on and then go straight south to the corner to get the Pharmacy Collection request . From here, go to the northwest corner of the area to find another light switch (turn them off), then get to the northeast corner to find a Darkness Key, allowing you to open the nearby locked door. As soon as you enter this area, go north and hit the switch, then find the center door along the east side, which will lead you into a small room with a Power Spot.
That’s not why you came here, though, as you want to go through the shortcut along the north wall, then use the door to go back to the previous room. Hit the switch right near the door, then go back through it, the shortcut and through the door to return to the same area, although now you can access the southern portion. Go straight south and you’ll see a shortcut along the southern wall, which will bring you to a small room with a chest ( Knight Scale ). Go back and grab the Darkness Key that’s in between the two FOEs by the hole in the floor, then use it to unlock the door to the east. You can’t go anywhere with the lights off here, so flip the switch to the south to turn them on.
Go past the locked door and a little more north to find a shortcut along the west wall, which you want to open, bringing you into the small room with the Power Spot. Head back to the light switch and turn the lights off, then make your way back to the small room with the Power Spot via the door in the last room. From here, you can use the shortcut you just opened to return to the room with the lights off. Head north and to the corner to find a Darkness Key, then make your way south to the locked door. There’s two dead ends to the north, with one making the SOS: Save Our Stomachs request available and the other housing a chest ( Direct Guard ). To the south are the stairs for the fourth floor.


 Sign up
No Comments