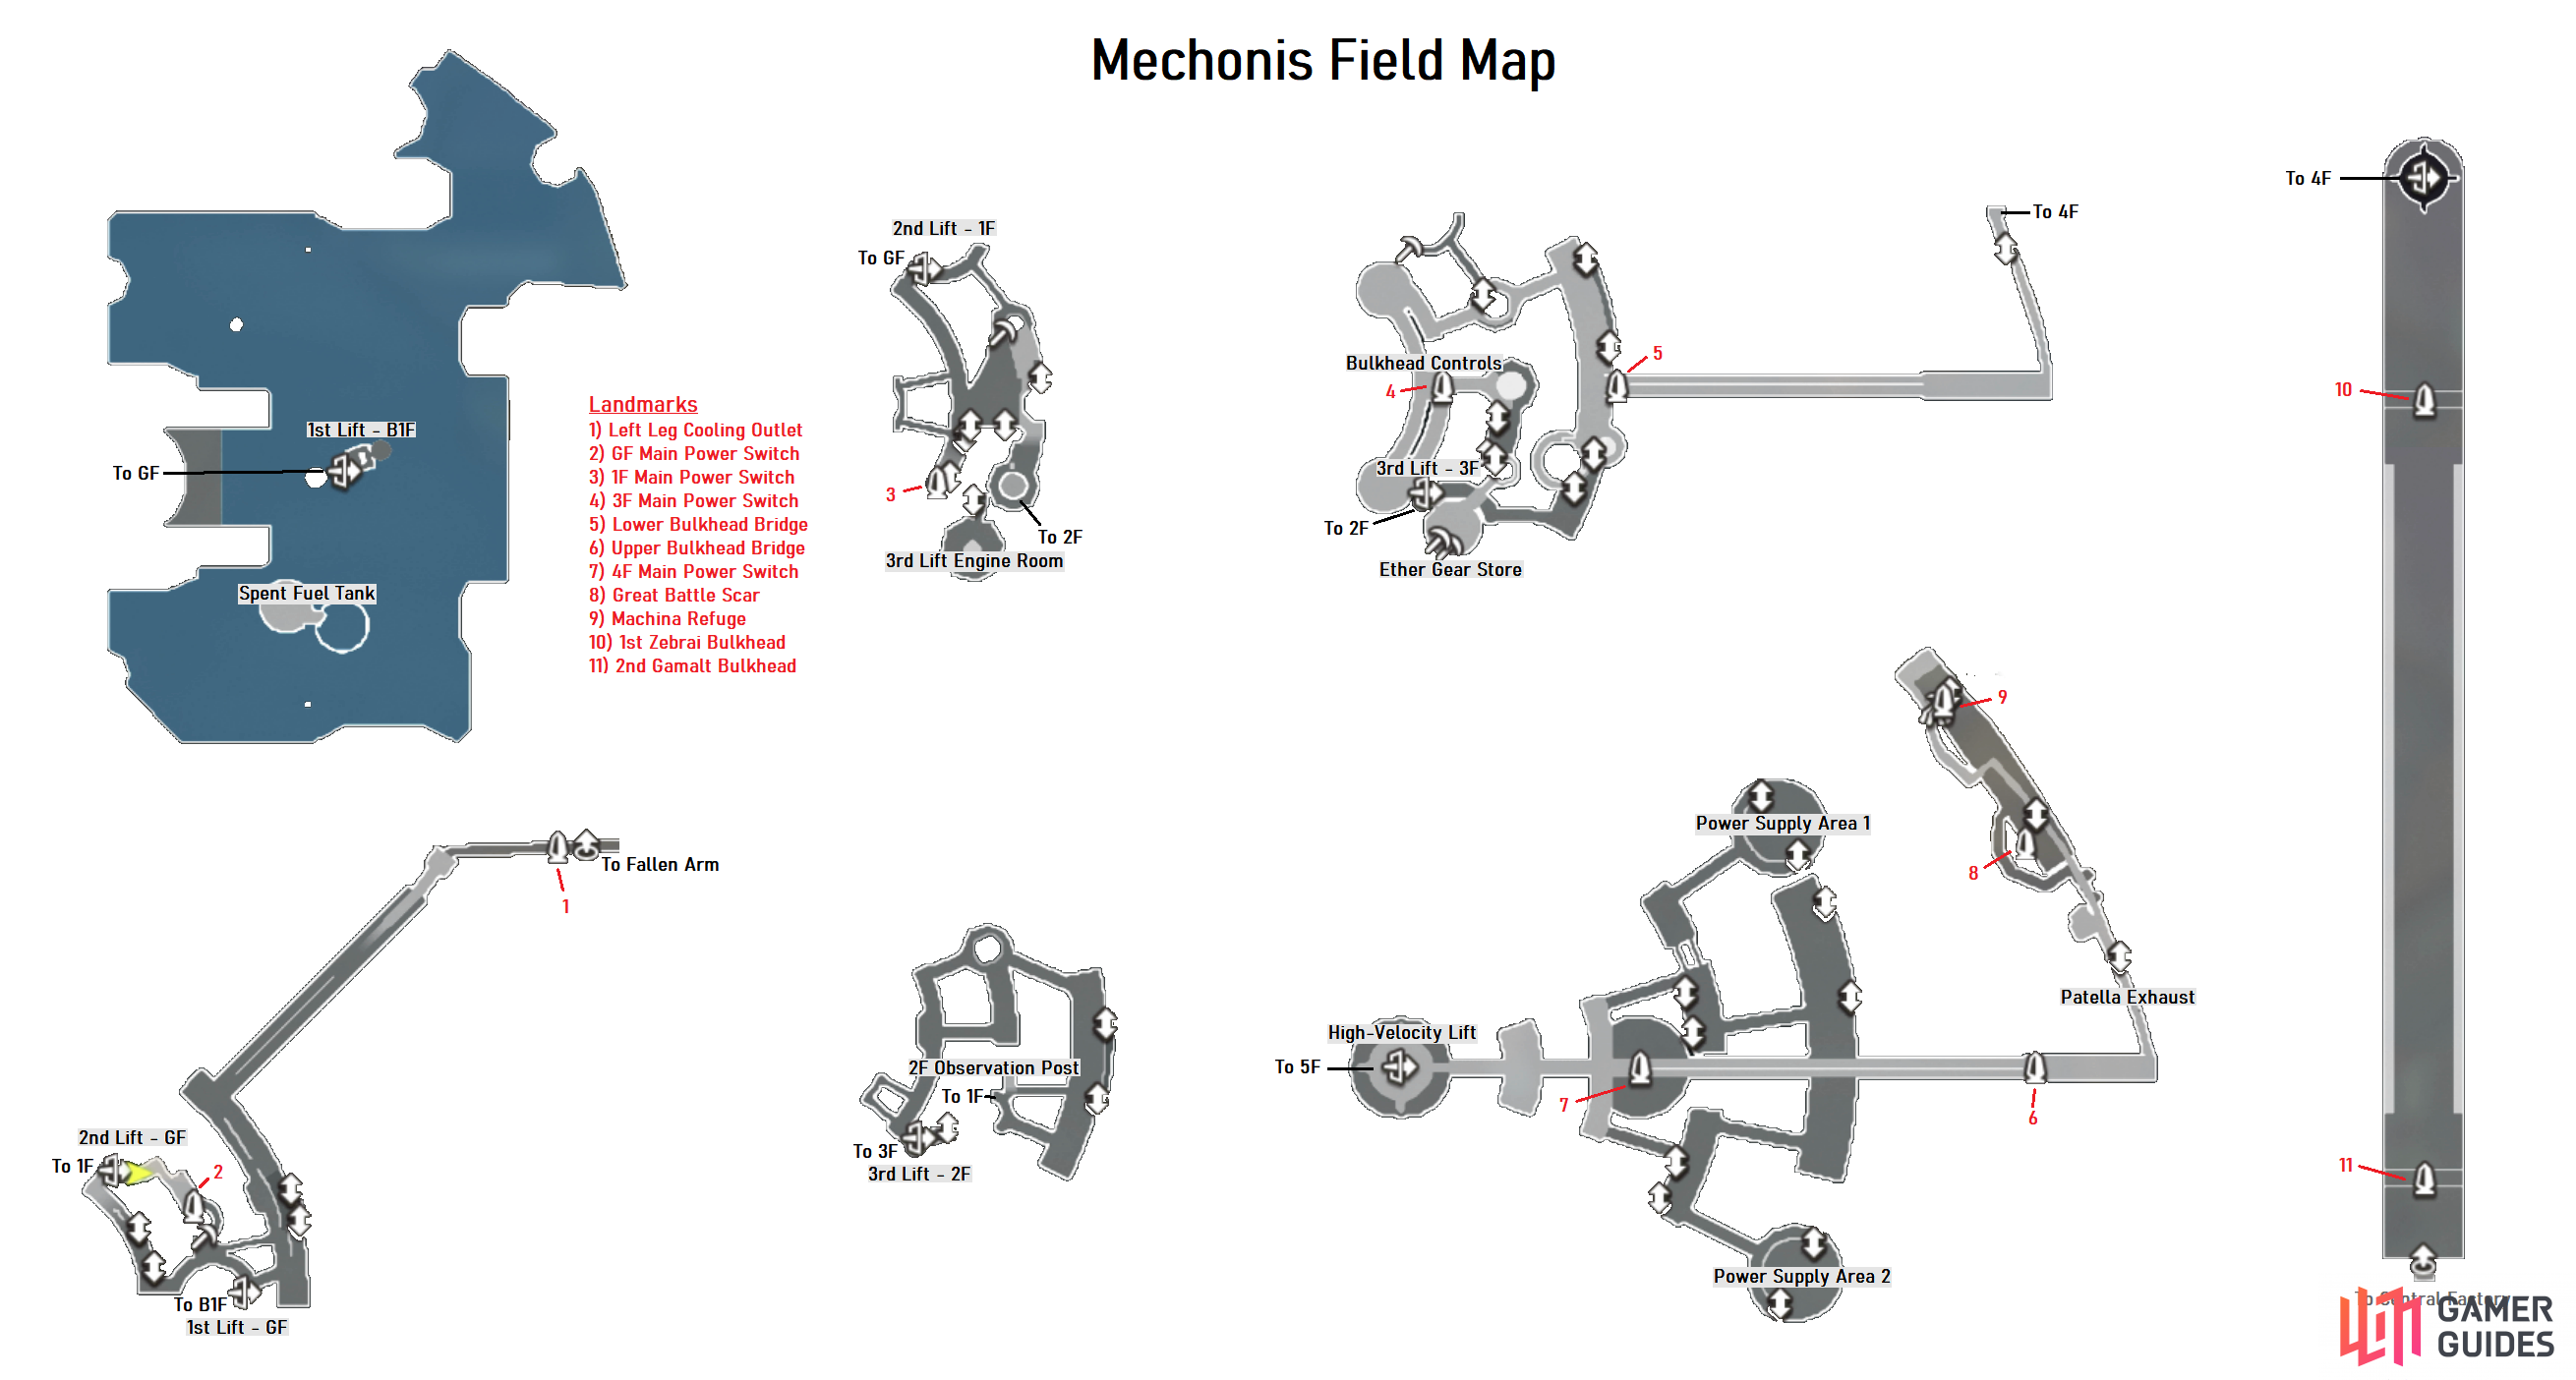
Mechonis Field is located within the left leg of the Mechonis and is quite large, despite the map shown in the game. You arrive here from the Fallen Arm and will face nothing but Mechon while exploring this region, meaning you will want to be prepared. Thankfully, you will start finding that the enemies will drop Anti-Mechon weapons. The only tricky area to get to on this map is the Spent Fuel Tank, which is located on B1F. On 1F, you will make a spiral ramp up to 2F, but at the base of the ramp, you can look over and see a pool below you. Jump down, into the pool of water, and you will arrive at the Spent Fuel Tank.
In order to reach the Machina Refuge, when you arrive at the Great Battle Scar, use the vent to launch yourself up to the next section. Instead of going south here, continue north and climb up to the ledge. Follow the path all the way to the end, putting you at the top of a very long slope. Your goal on this slope is to get to the second ledge sticking out, noting that you can hold in the opposite direction of you going down to slow your descent. Once you get to the second ledge, there will be one more little climb to reach the Machina Refuge.
Collectopaedia
| Category | Items | Reward |
|---|---|---|
| Vegetables | Juicy Steakplant, Acerola Pea, Energy Aubergine, Sweet Pepper | Taurus Arms |
| Flower | Azure Hollyhock, Utopia Crocus | Agility Up IV |
| Bug | Scarlet Crawler, Shiny Scarab, Water Boatman | Daze Up IV |
| Nature | Ivy Nest, Mossy Panel, Bronze Wood | First Atk Plus III |
| Parts | Retro Diode, Modern Blue Gear, Snow Transistor | Lightning Attack IV |
| Strange | Tweet Tweet, Flame Frame | Fall Defence IV |
- The reward for finishing the Collectopaedia for this area is a Taurus Helm (Heavy Helm)
Landmarks
| Landmark | When Available | Area |
|---|---|---|
| Left Leg Cooling Outlet | First Visit | GF |
| GF Main Power Switch | First Visit | GF |
| 1F Main Power Switch | First Visit | 1F |
| 3F Main Power Switch | First Visit | 3F |
| Lower Bulkhead Bridge | First Visit | 3F |
| Upper Bulkhead Bridge | First Visit | 4F |
| 4F Main Power Switch | First Visit | 4F |
| Great Battle Scar (Secret) | First Visit | 4F |
| Machina Refuge (Secret) | First Visit | 4F |
| 1st Zebrai Bulkhead | First Visit | 5F |
| 2nd Gamalt Bulkhead | First Visit | 5F |
Locations
| Location | When Available | Area |
|---|---|---|
| 1st Lift - B1F | First Visit | B1F |
| Spent Fuel Tank | First Visit | B1F |
| 1st Lift - GF | First Visit | GF |
| 2nd Lift - GF | First Visit | GF |
| 2nd Lift - 1F | First Visit | 1F |
| 3rd Lift Engine Room | First Visit | 1F |
| 2F Observation Post | First Visit | 2F |
| 3rd Lift - 2F | First Visit | 2F |
| 3rd Lift - 3F | First Visit | 3F |
| Bulkhead Controls | First Visit | 3F |
| Ether Gear Store | First Visit | 3F |
| Patella Exhaust | First Visit | 4F |
| Power Supply Area 1 | First Visit | 4F |
| Power Supply Area 2 | First Visit | 4F |
| High-Velocity Lift | First Visit | 4F |
Normal Enemies
| Enemy | Level | Location |
|---|---|---|
| Defensive/ONION | 56 | Near 4F Main Power Switch, 3F Main Power Switch |
| M37/WITCH | 55 | Near 2nd Lift - 1F |
| M37/ZEBRA | 54 | Around GF Main Power Switch, 1st Lift - GF |
| M45/VIOLA | 55 | South of 3F Main Power Switch, Ether Gear Store |
| M55/GRACE | 54 | Around GF Main Power Switch |
| M57/FAITH | 54 | Around GF Main Power Switch |
| M66/TRICK | 54 | Near 3F Main Power Switch, Power Supply Area 1 and 2 |
| M68/CHORD | 55-57 | Around GF Main Power Switch, Ether Gear Store |
| M76/MOIST | 58 | Near 4F Main Power Switch, South of Power Supply Area 1 |
| M84/GRUNT | 57 | Around GF Main Power Switch |
| M91/DOGMA | 59 | North of Lower Bulkhead Bridge, South of 3F Main Power Switch |
| Offensive/HONEY | 56 | North of 3F Main Power Switch, Can be summoned by M45/VIOLA |
| Offensive/SCOUT | 56 | North of 3F Main Power Switch, Can be summoned by M45/VIOLA |
Unique Monsters
| Unique Monster | Level | Location |
|---|---|---|
| Amorous Arca | 57 | Bulkhead Controls (upper level) |
| Commander Oracion | 61 | Spent Fuel Tank |
| Destroyer Salvacion | 59 | 2F Observation Post |
| Infernal Crocell | 58 | North of Power Supply Area 2 |
| Revolutionary Bifrons | 60 | Northeast of 4F Main Power Switch |


 Sign up
No Comments