
There’s a wide variety of arms and armor for you to find and customize in Fallout 4, and in the case of weapons, the customization can radically alter how a weapon functions. The difference between a ![]() Pipe Pistol, a
Pipe Pistol, a ![]() Pipe Rifle and a Pipe SMG is really just a matter of the grip, barrel, reciever and magazine the weapon has, allowing one to be converted to the other on a whim… provided you have the materials and perks to do so. However skilled and rich you are, there’s one thing you can’t change about a weapon or piece of armor - its legendary prefix. As you explore there’s a chance you’ll encounter legendary enemies, and these enemies will always drop one random piece of legendary gear. Legendary gear can - with the right prefix - be vastly more powerful than any non-legendary weapon could hope to be, regardless of how you mod the two, especially in the case of weapons. That being the case, being able to farm legendary gear should be of great interest to any player, especially ways to farm specific types of arms and armor with specific prefixes, a feat this page will help you accomplish.
Pipe Rifle and a Pipe SMG is really just a matter of the grip, barrel, reciever and magazine the weapon has, allowing one to be converted to the other on a whim… provided you have the materials and perks to do so. However skilled and rich you are, there’s one thing you can’t change about a weapon or piece of armor - its legendary prefix. As you explore there’s a chance you’ll encounter legendary enemies, and these enemies will always drop one random piece of legendary gear. Legendary gear can - with the right prefix - be vastly more powerful than any non-legendary weapon could hope to be, regardless of how you mod the two, especially in the case of weapons. That being the case, being able to farm legendary gear should be of great interest to any player, especially ways to farm specific types of arms and armor with specific prefixes, a feat this page will help you accomplish.
Farming Legendaries (Next Gen Update)
For a quick rundown (tl;dr):
- Rest at
 Sanctuary for three weeks (until the
  National Guard Training Yard is not longer [CLEARED].
 - Make a hardsave at Sanctuary.
- Fast travel to the National Guard Training Yard.
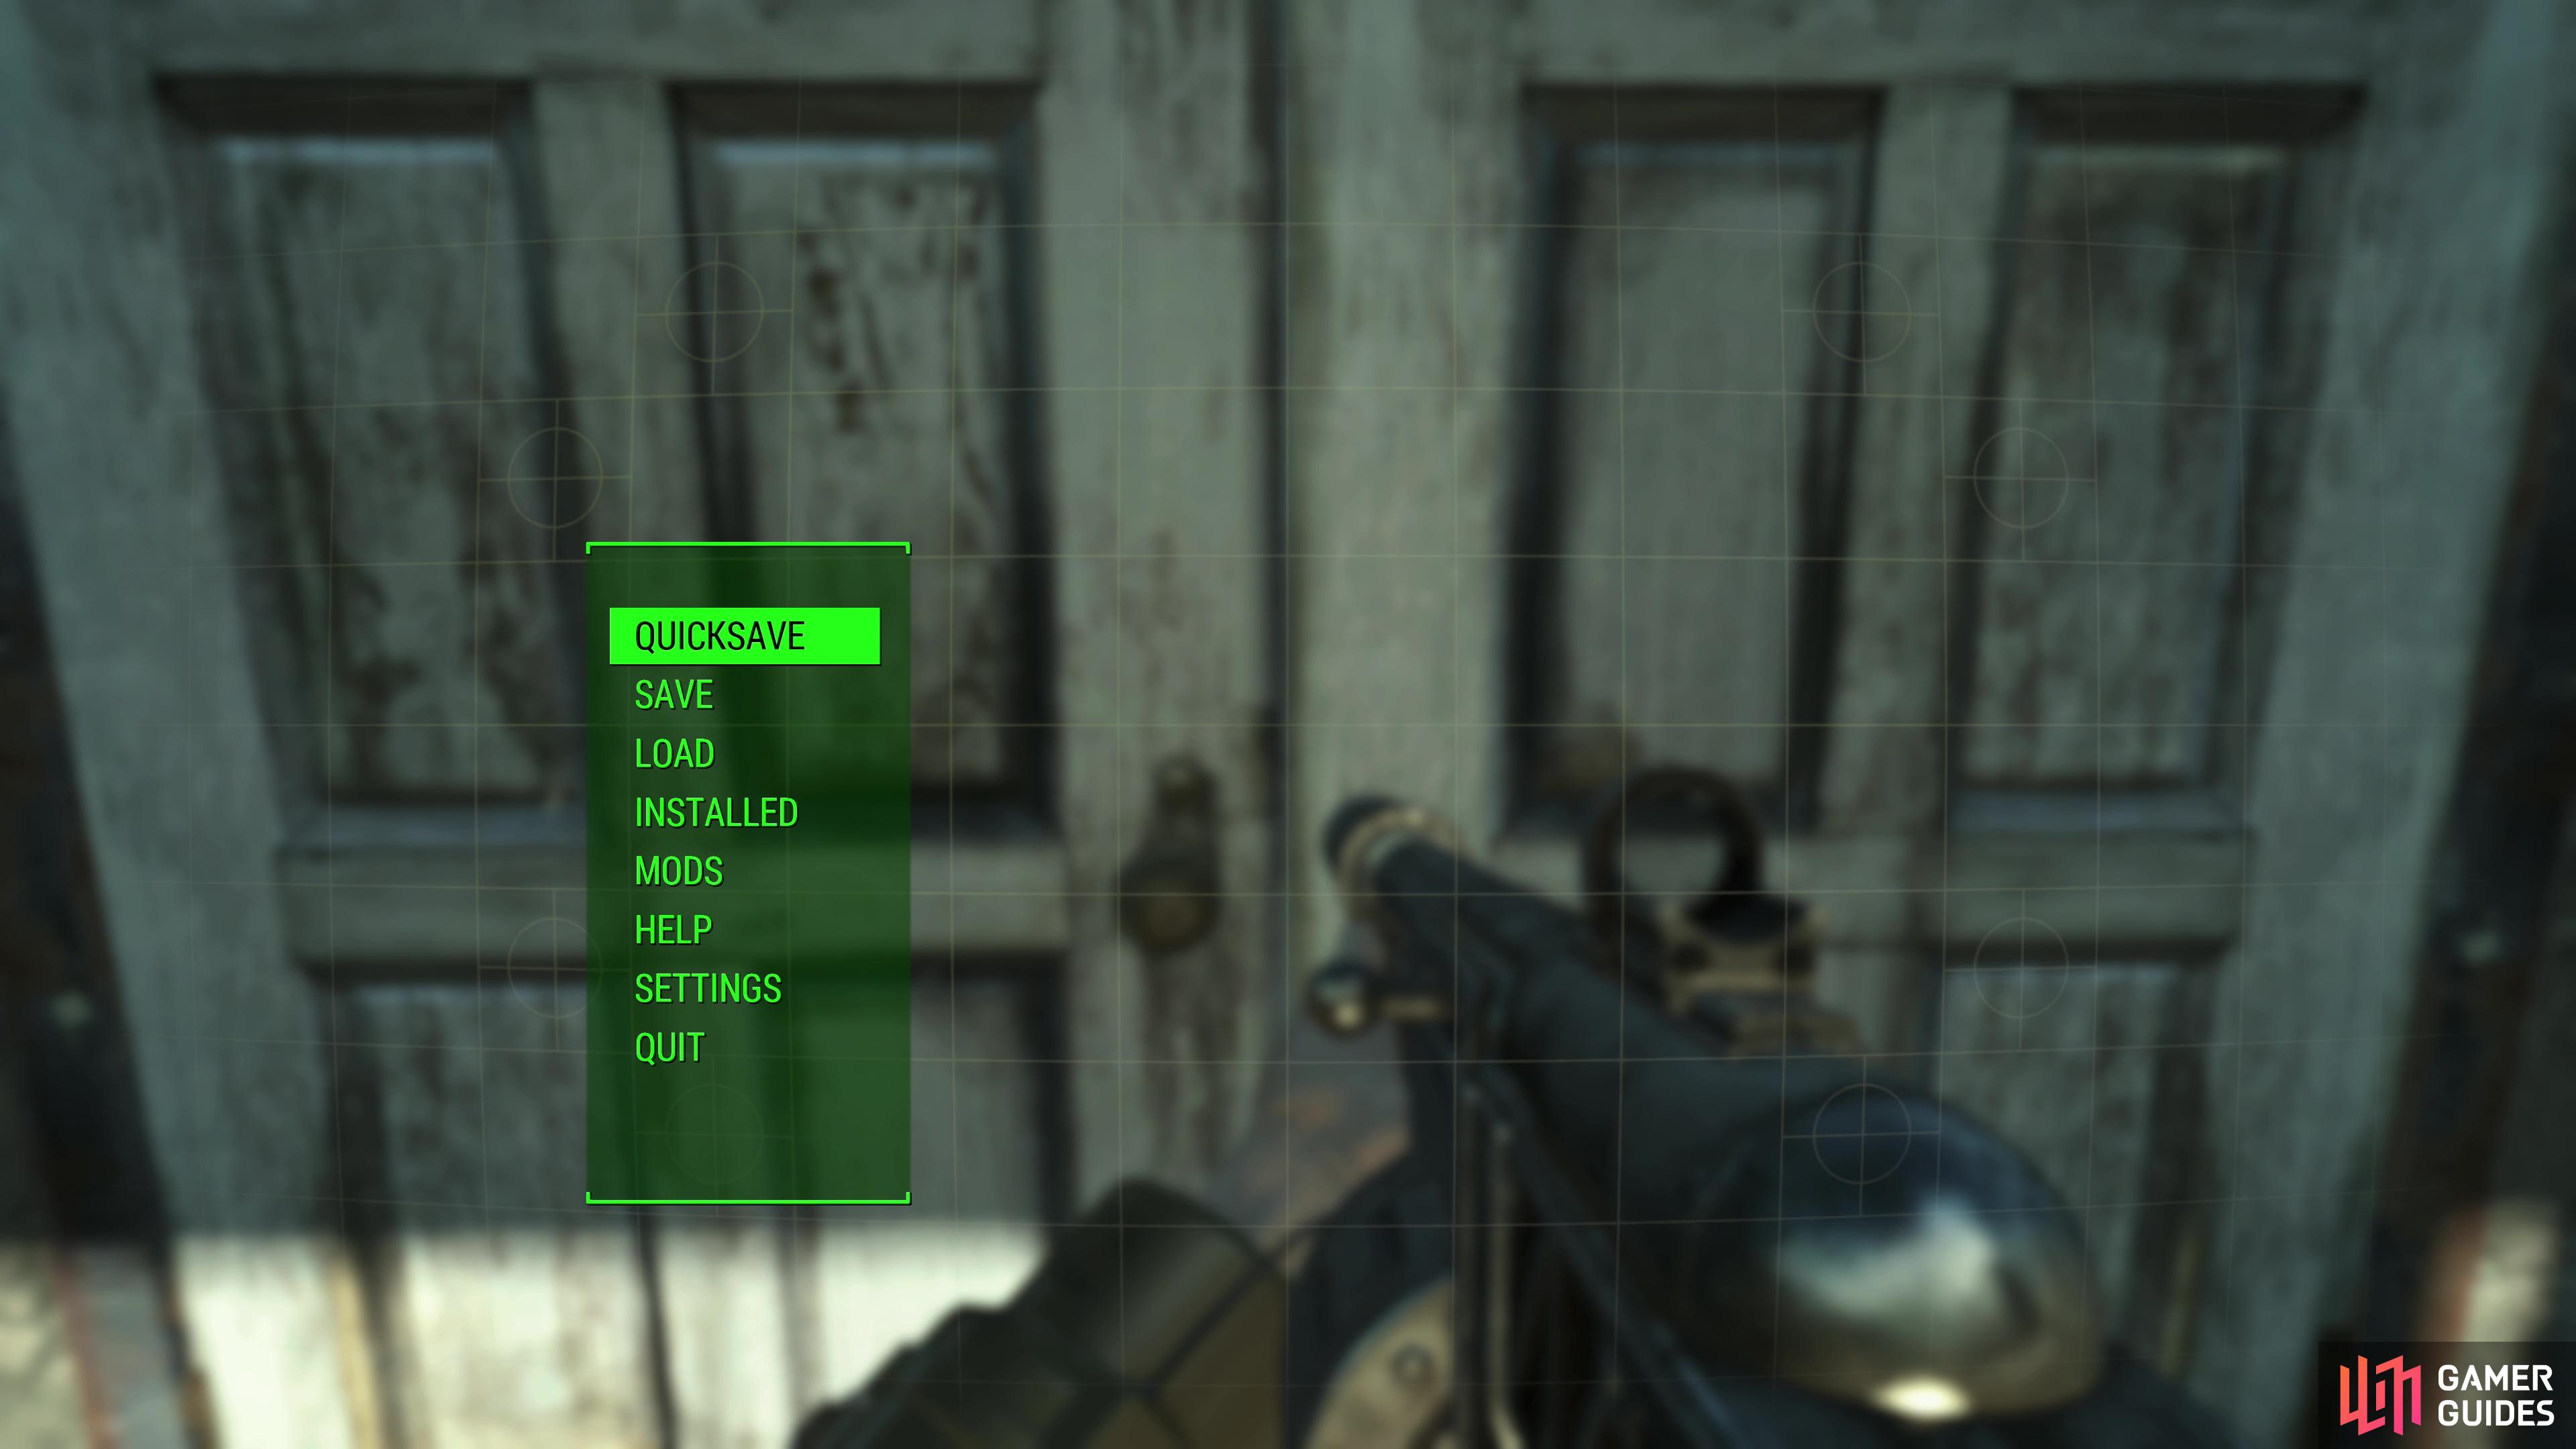
- Make a quicksave outside the doors to the building.
- Enter and check for a legendary Ghoul. If one doesn’t spawn, reload the quicksave.
- If a legendary Ghoul does spawn, kill it and see what type of legendary item it drops.
- If the legendary Ghoul doesn’t drop a desirable item, reload the quicksave.
- If it drops a good legendary item (i.e. Combat Shotgun) with an undesirable legendary prefix, reload the autosave that was created when you entered the building.
- Loading the autosave will keep the legendary spawn and item type, but reroll the prefixes. Keep killing the legendary and checking its drop until you get a item/prefix combo you like.
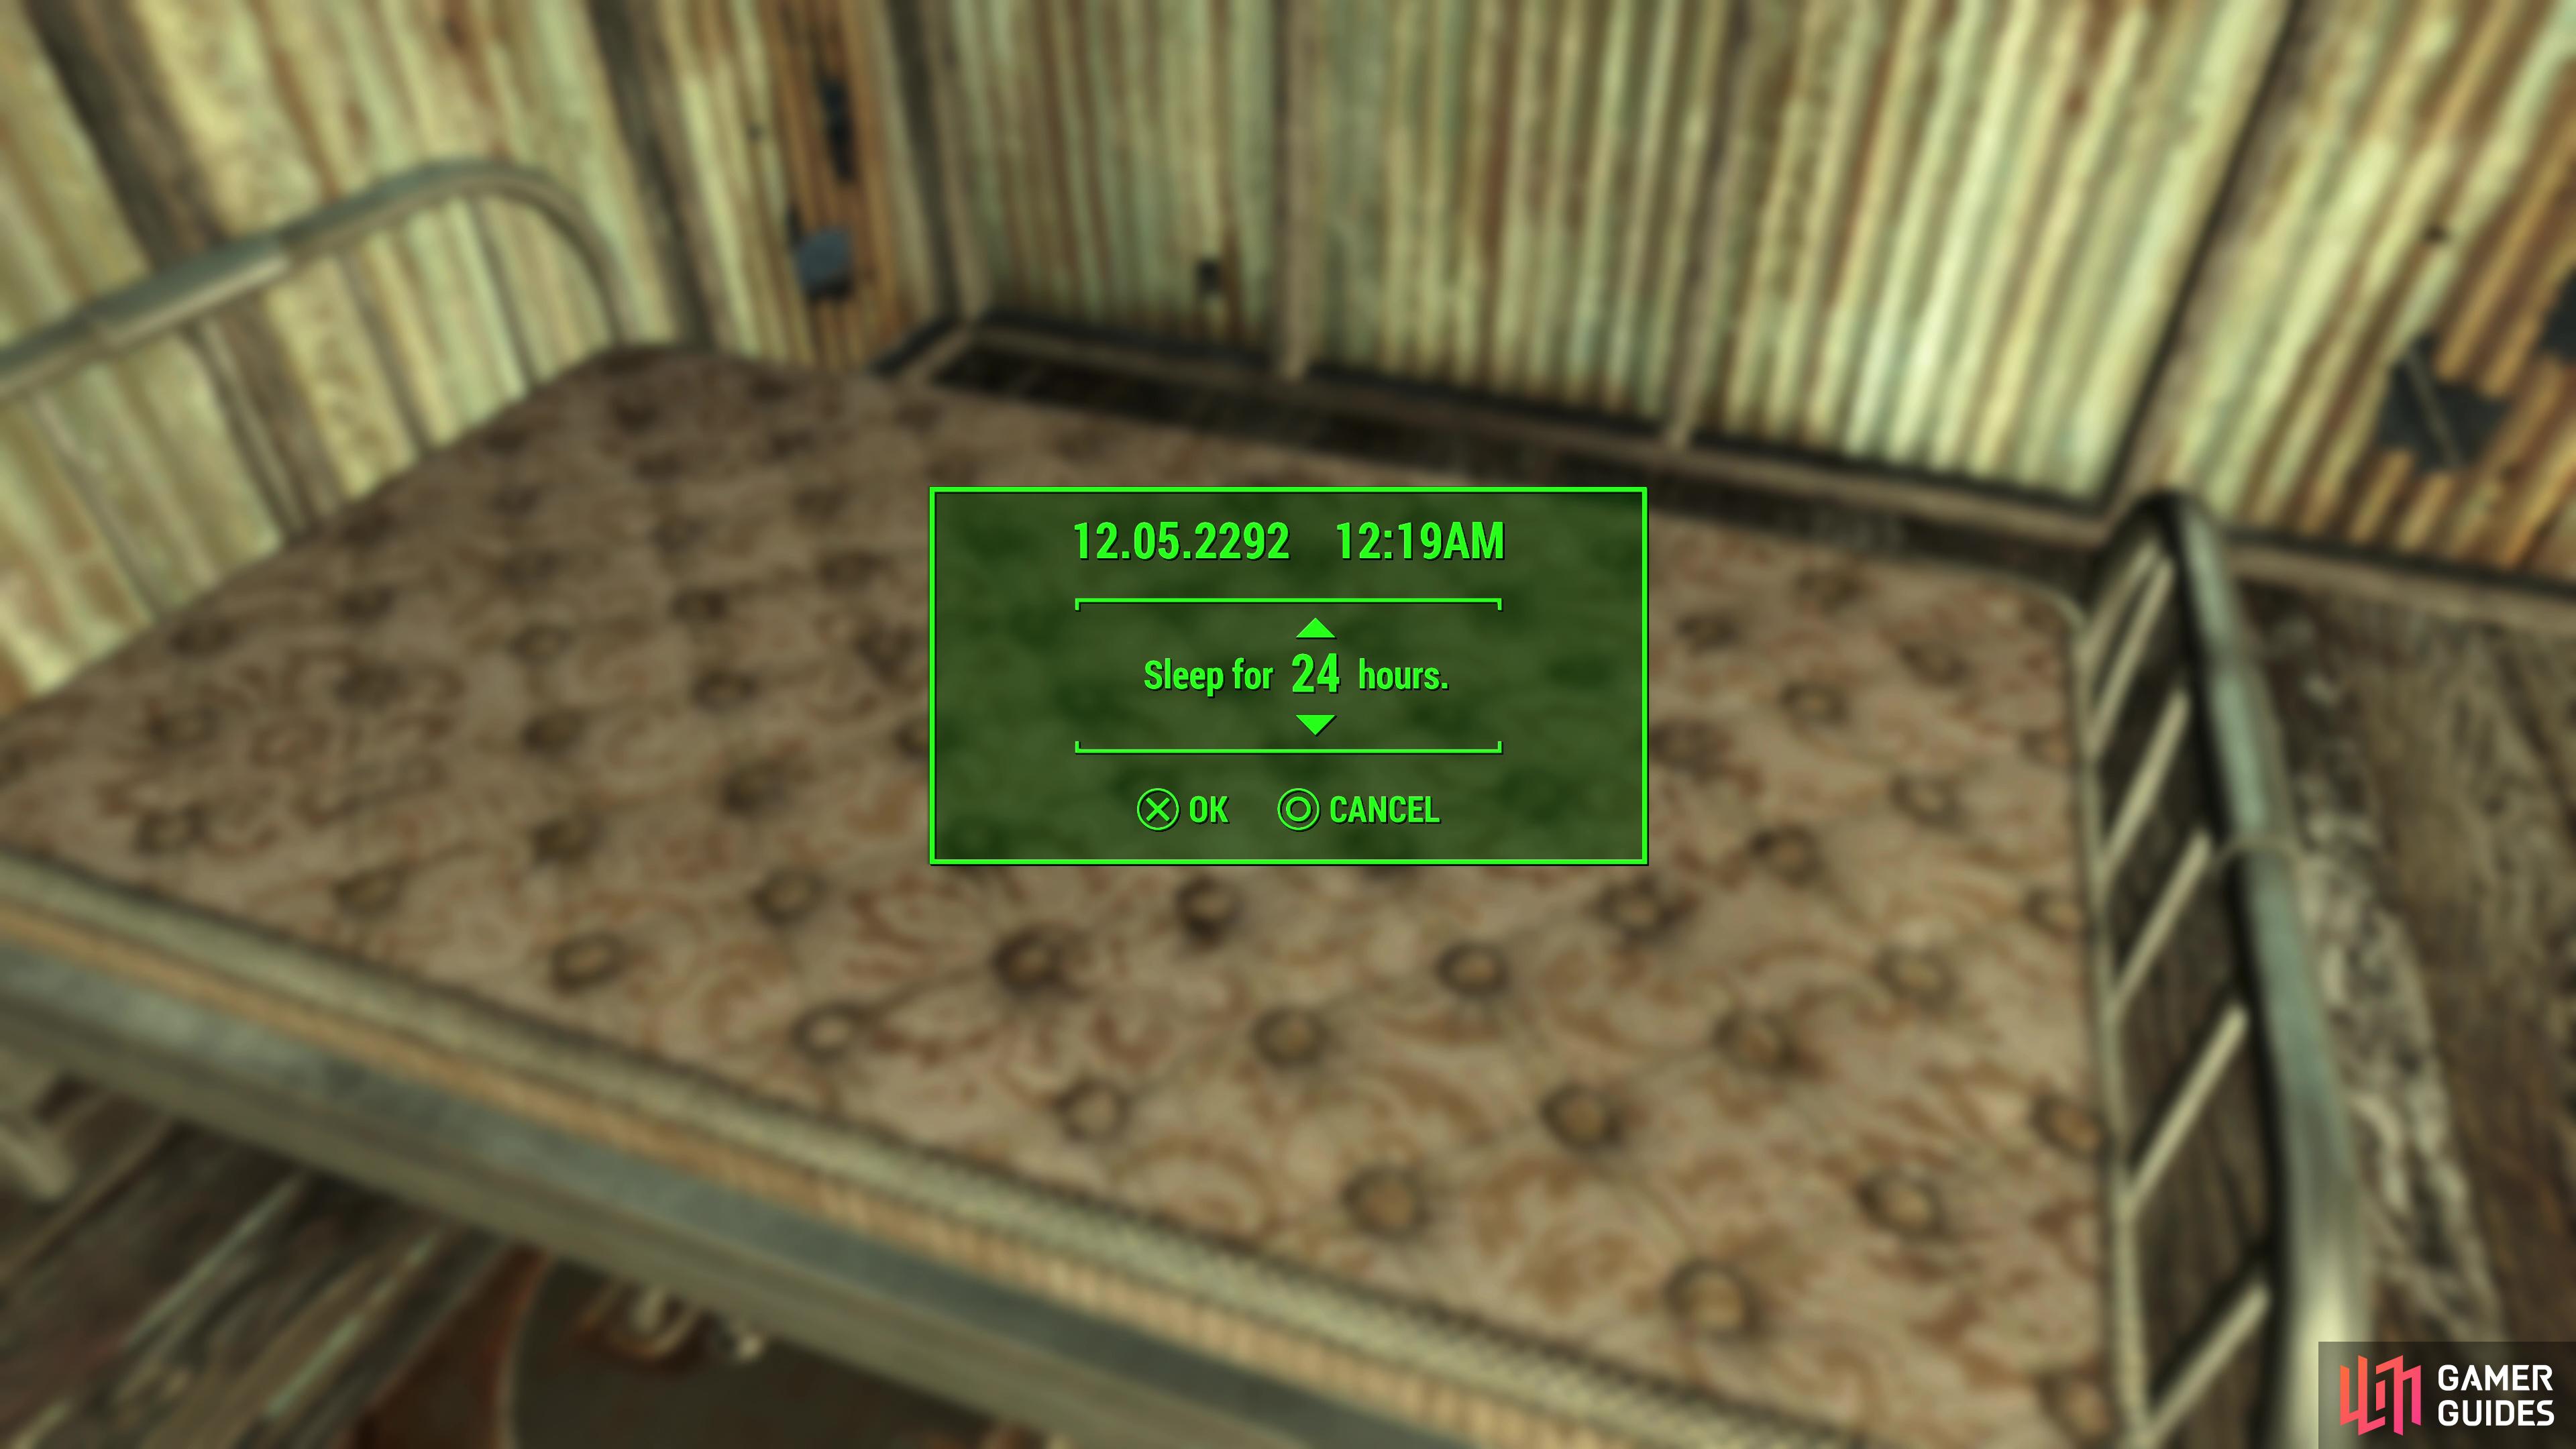
(1 of 2) Rest in Sanctuary for as long as three weeks,
Rest in Sanctuary for as long as three weeks, (left), to ensure you get a clean spawn of the National Guard Training Yard. (right)
How Legendary Drops Work
Everything about legendary drops, at every phase in the farming process, is a matter of RNG. It’s an onion of layered RNG checks that must be navigated - often in succession, sometimes overlapping - that can be a bit perplexing for the uninformed. That being the case, we’ll explain how this process works, step-by-step, starting with legendary drops in their most spontaneous, pure form.
Before you farm for specific legendary gear and legendary prefixes, you must first farm for legendary drops, which is to say, legendary enemies. Without looking under the hood, enemies have a chance of spawning as a “legendary” variant, which basically just means higher stats and the chance to “mutate” during combat, recovering health and generally posing a stiffer challenge than normal enemies. The chances of encountering a legendary increase by level - if you’re under level 5 you won’t encounter any random legendaries (although scripted ones may still appear), while hitting level 50+ gives you the maximum legendary encounter rate. The game’s difficulty level also determines legendary enemy spawn rates, so to have the best odds of running afoul of a legendary enemy you’ll need to be level 50 or higher and be playing on Very Hard difficulty. Of course, the difficulty only affects the spawn rate, so once you find a legendary enemy, you’re free to decrease the difficulty so whatever you need it to be. It’s also worth noting that your level influences what sort of gear can drop, you won’t be getting Combat Shotguns at level 10, so for the best gear you’ll need to be leveled… although a level in the 20s or 30s is sufficient to put most of the gear you’d want to find on the rotation.
The actual numbers in play aren’t terribly important for our purposes, just note that if you’re not getting legendary enemy spawns frequently, or you’re not finding the types of arms and armor you want, level and difficulty could be playing a factor. It’s also worth noting that whatever the percentages you find online say, this doesn’t seem to be a per-enemy chance. Is it per-encounter? Per group? Per area? Hard to say, but a noticeable trend is that in a specific area or among a specific group of enemies, only one legendary tends to spawn. It’s hard to nail down what groups/areas count as one spawn pool, but don’t expect more than one legendary enemy to appear at a time.
Legendary Drop Pools
One legendary enemy drops one random legendary item, so getting a legendary enemy to spawn is synonymous with getting a legendary drop. That said, there are factors that can influence what type of items drop and what prefixes they spawn with.
As mentioned earlier, base item quality can be level dependent, so if you’re low level you shouldn’t expect to find a legendary ![]() Minigun on a Bloatfly. At higher levels… well, crazy things can happen. The reverse unfortunately isn’t true, and many legendary spawns will be wasted when a legendary
Minigun on a Bloatfly. At higher levels… well, crazy things can happen. The reverse unfortunately isn’t true, and many legendary spawns will be wasted when a legendary ![]() Deathclaw drops you some
Deathclaw drops you some ![]() Board or
Board or ![]() Pipe Wrench with a legendary prefix.
Pipe Wrench with a legendary prefix.
The real interesting bit is with the prefixes themselves. Some prefixes can only spawn on specific types of weapons and armor. The Berserking prefix can only spawn on melee weapons, the Two Shot prefix only appears on ranged weapons and the almighty Explosive prefix is even more granular, only spawning on ballistic weapons (as opposed to energy weapons). On top of this, legendary prefix spawns are pulled from a rotating pool that only replenishes when you spawn enough different legendary items or level up. The upshot of this is that you will not usually find the same legendary prefix twice in short succession, so if you get an Explosive Pipe Pistol… bad luck, as you won’t find another Explosive weapon for a while. So if you’re farming for a specific prefix and it’s not appearing, that could be why.
Legendary Item Farming
If you just want legendary drops, pick a direction and start walking. Clear dungeons. Kill things. Legendary enemy spawns aren’t that uncommon. This is a poor way of getting a specific legendary item with a specific prefix, however, as the number of different arms and armor as well as prefixes makes finding anything good rather unlikely. Fret not, however, as you’re not confined to junk weapon purgatory… if you’re willing to undertake some admittedly tedious grinding.
Legendary enemy spawns can be somewhat predictable, it turns out, as certain dungeons have a fairly high chance of spawning a legendary enemy in a relatively advantageous location, minimizing the amount of running about and fighting you have to do. You can also save scum at various different points to lock in both legendary enemy spawn locations and item drops, allowing you to focus-farm a specific prefix on a specific item. This can still take a while, and requires some fiddling with the setup (a setup that’s not 100% foolproof, as there’s a lot of weird RNG going on), but the process is reliable, especially compared to blindly wandering about and hoping you get the drop you want from a random legendary enemy spawn.
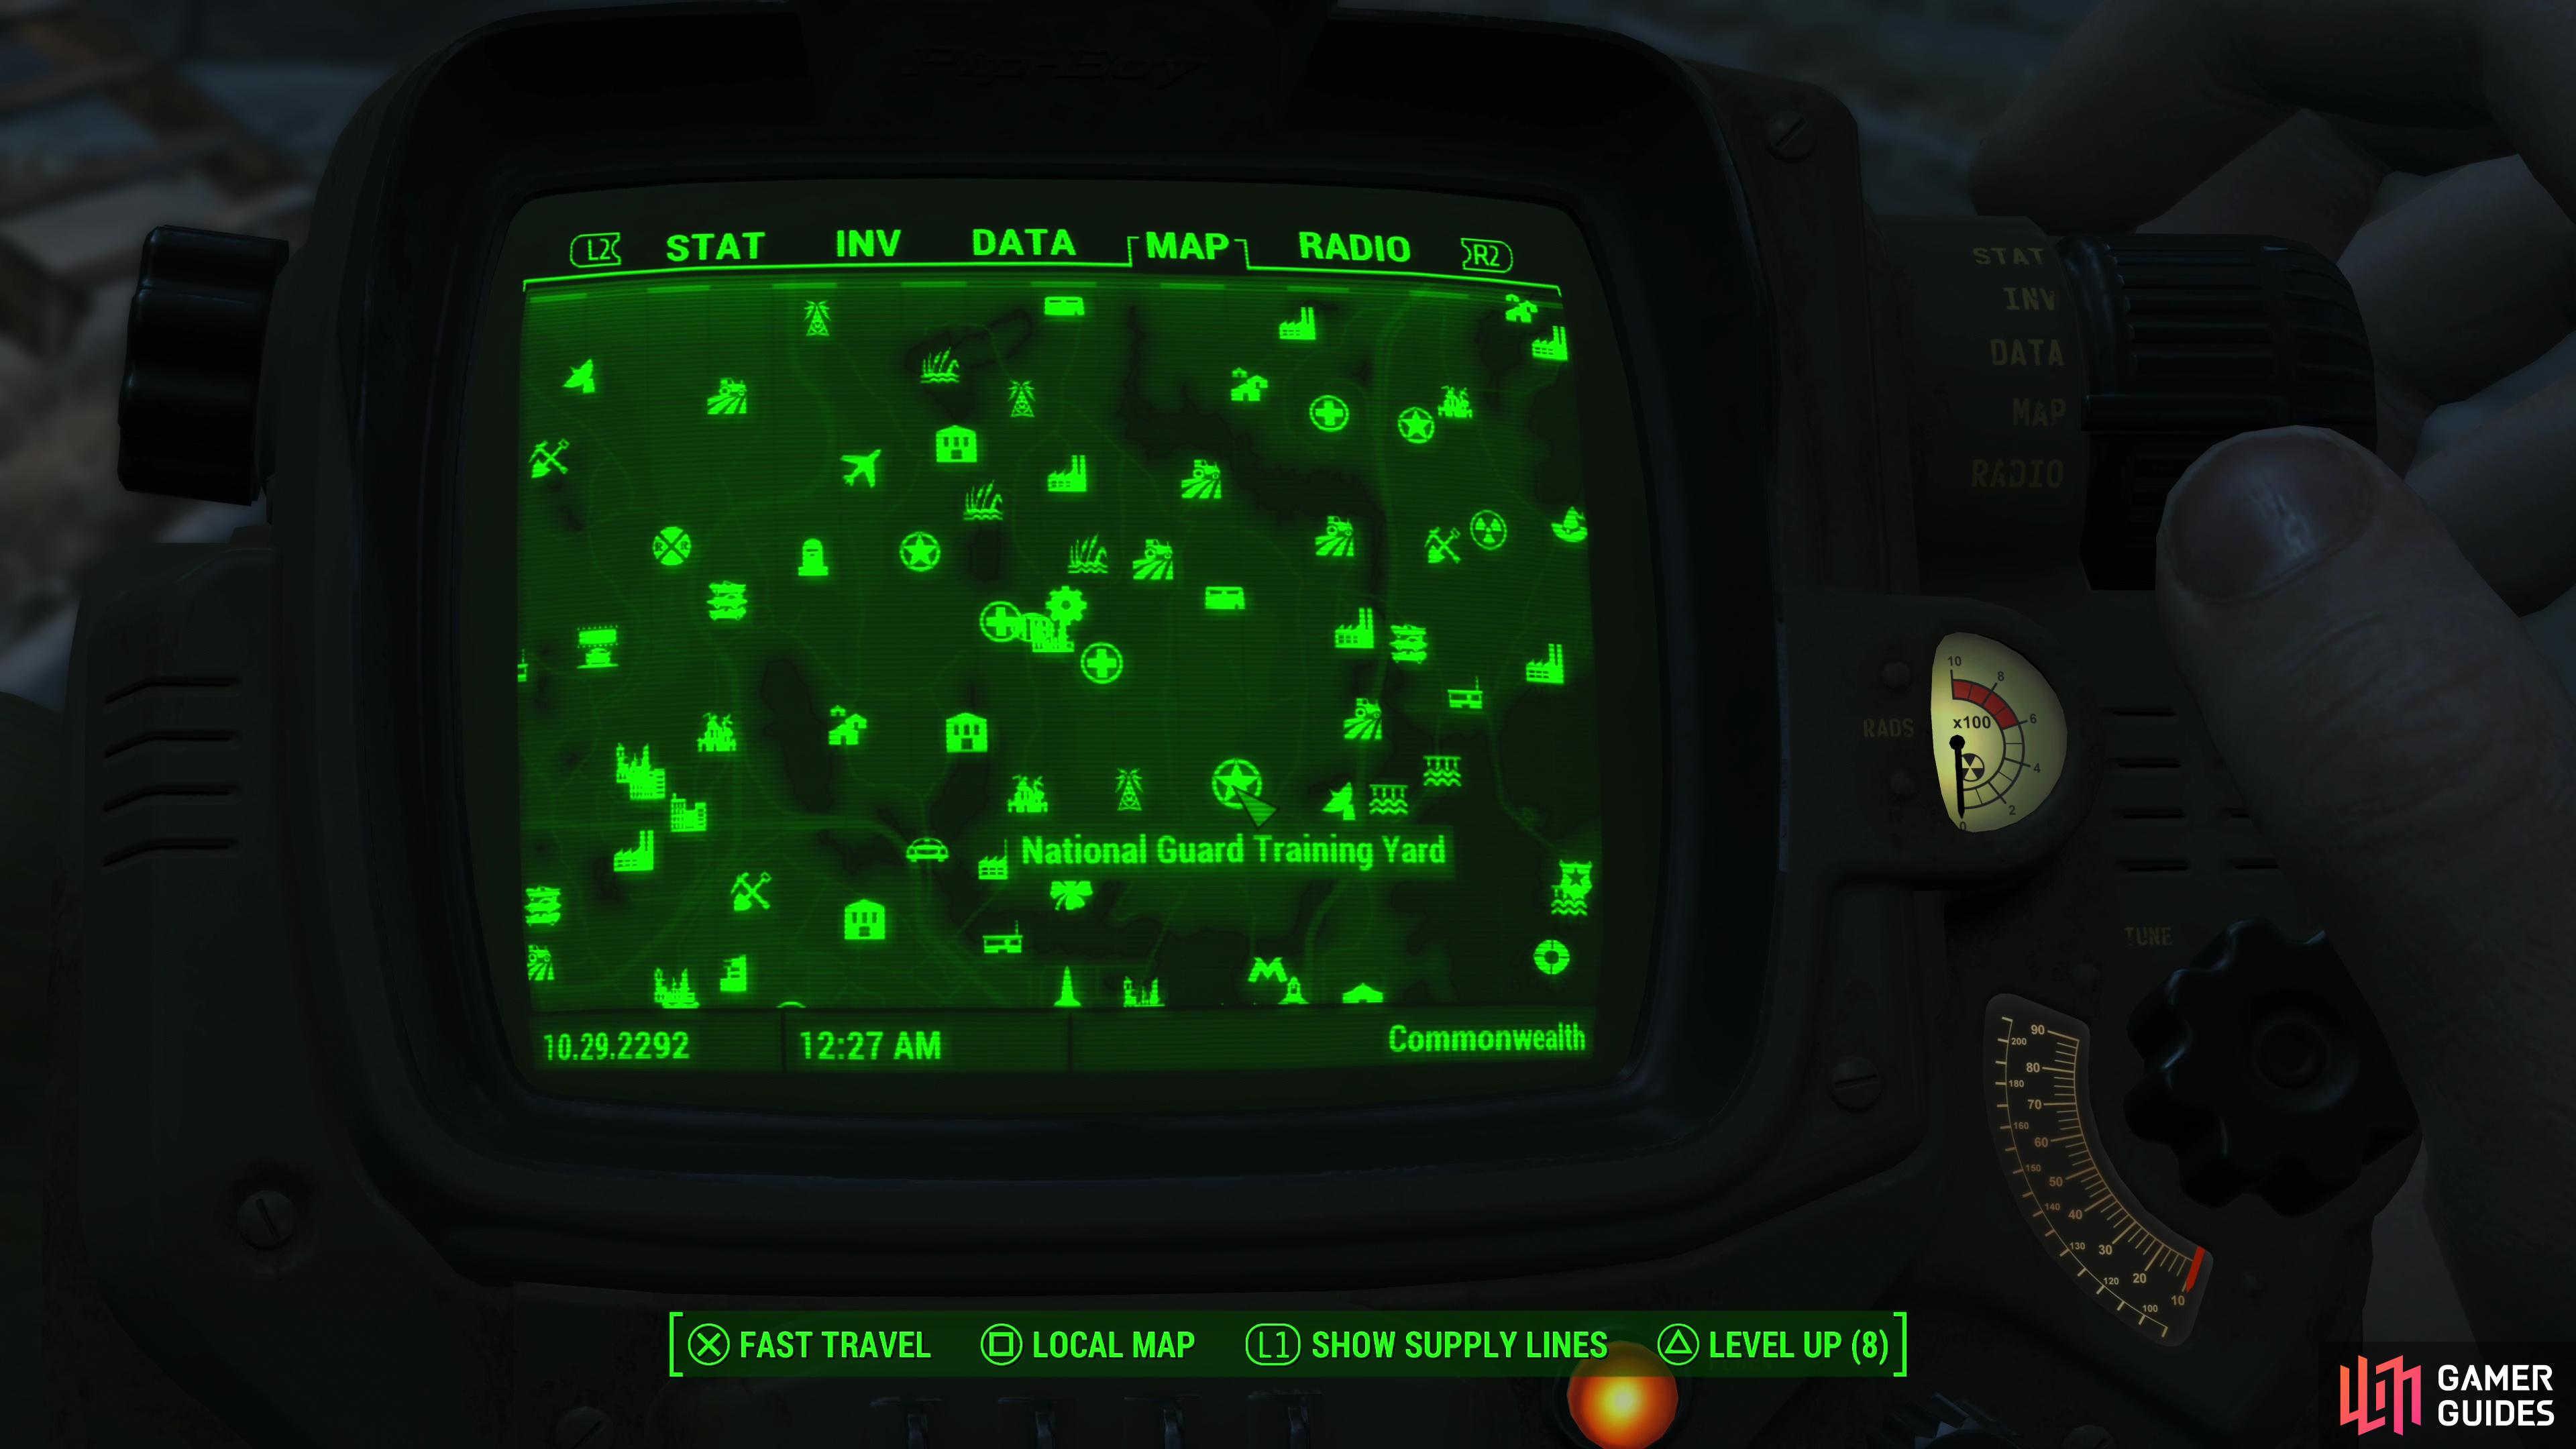
Best Farming Location - National Guard Training Yard
First up we need a target, a place where legendary enemies spawn regularly and in a spot that’s easy to reach. Not much use farming if we have to clear an entire dungeon for one legendary roll, and for reasons that’ll become clear, the less we’re zoning in and out of area - and hence autosaving - the easier it is to save scum for legendary drops. There are a few locations that work for our purposes, including the Super Duper Mart, Gunner Plaza, and most of all, the National Guard Training Yard. Whichever dungeon you scour, the general concept remains the same - one enemy somewhere inside may end up being legendary, so in theory you just need to head over to the dungeon, quicksave outside, enter, find the legendary enemy, kill them and check what legendary item they drop. If it’s not to your liking, reload the quicksave and try again.
The reality is a bit more complicated. There’s a chance (depending on your level, the difficulty setting, and dumb luck) that a legendary enemy won’t spawn, or they won’t spawn close enough to the entrance to make them easy to farm. Or an enemy could spawn in an outdoor location, or in a subarea you have to zone into (like a basement, for example), both of which can make it tricky to trigger the RNG we want. Either way, we want a clean spawn of an area, and we’ll use the National Guard Training Yard as our example farming run, as in our experience it’s the best place to farm once you get all the RNG wrangled.
The National Guard Training Yard can be found a good ways east of Sanctuary, across the river past ![]() Lexington. It’s located just north of the Country Crossing settlement.
Lexington. It’s located just north of the Country Crossing settlement.
Spawning Legendary Enemies
First up you want to get a clean spawn of the area you’re targeting - in this case the National Guard Training Yard. If you get close to a dungeon, the spawns inside and around it could be set, so the only way to know for sure that it has a clean spawn is to clear the dungeon. Once this is done you should see the text [CLEARED] under the area’s name when you view it via your Pip-Boy. Clear the dungeon, then head far away - Sanctuary should suffice. You’ll now need to rest for up to three weeks until the area respawns - you can tell this happened because the [CLEARED] text will be gone. Assuming you stayed away and rested the whole time, when you fast travel back to the National Guard Training Yard, it should get a fresh spawn. Before you do, however, make a hard save at Sanctuary. If nothing spawns when you go to the National Guard Training Yard (or at least, if no legendary enemies spawn) you can reload the hard save and try again without wasting time resting.
When you arrive at a clean spawn of the National Guard Training Yard, check via VATs to make sure the turrets have respawned atop the roof. Assuming you destroyed them earlier, this is a good way to test that the area has, in fact, fully respawned. Go up to the front doors (along the southern side of the building) and make a quick save. If a legendary does spawn inside, this should ensure that same legendary keeps spawning, since this save would have been made after traveling to the National Guard Training Yard and setting the spawns within.
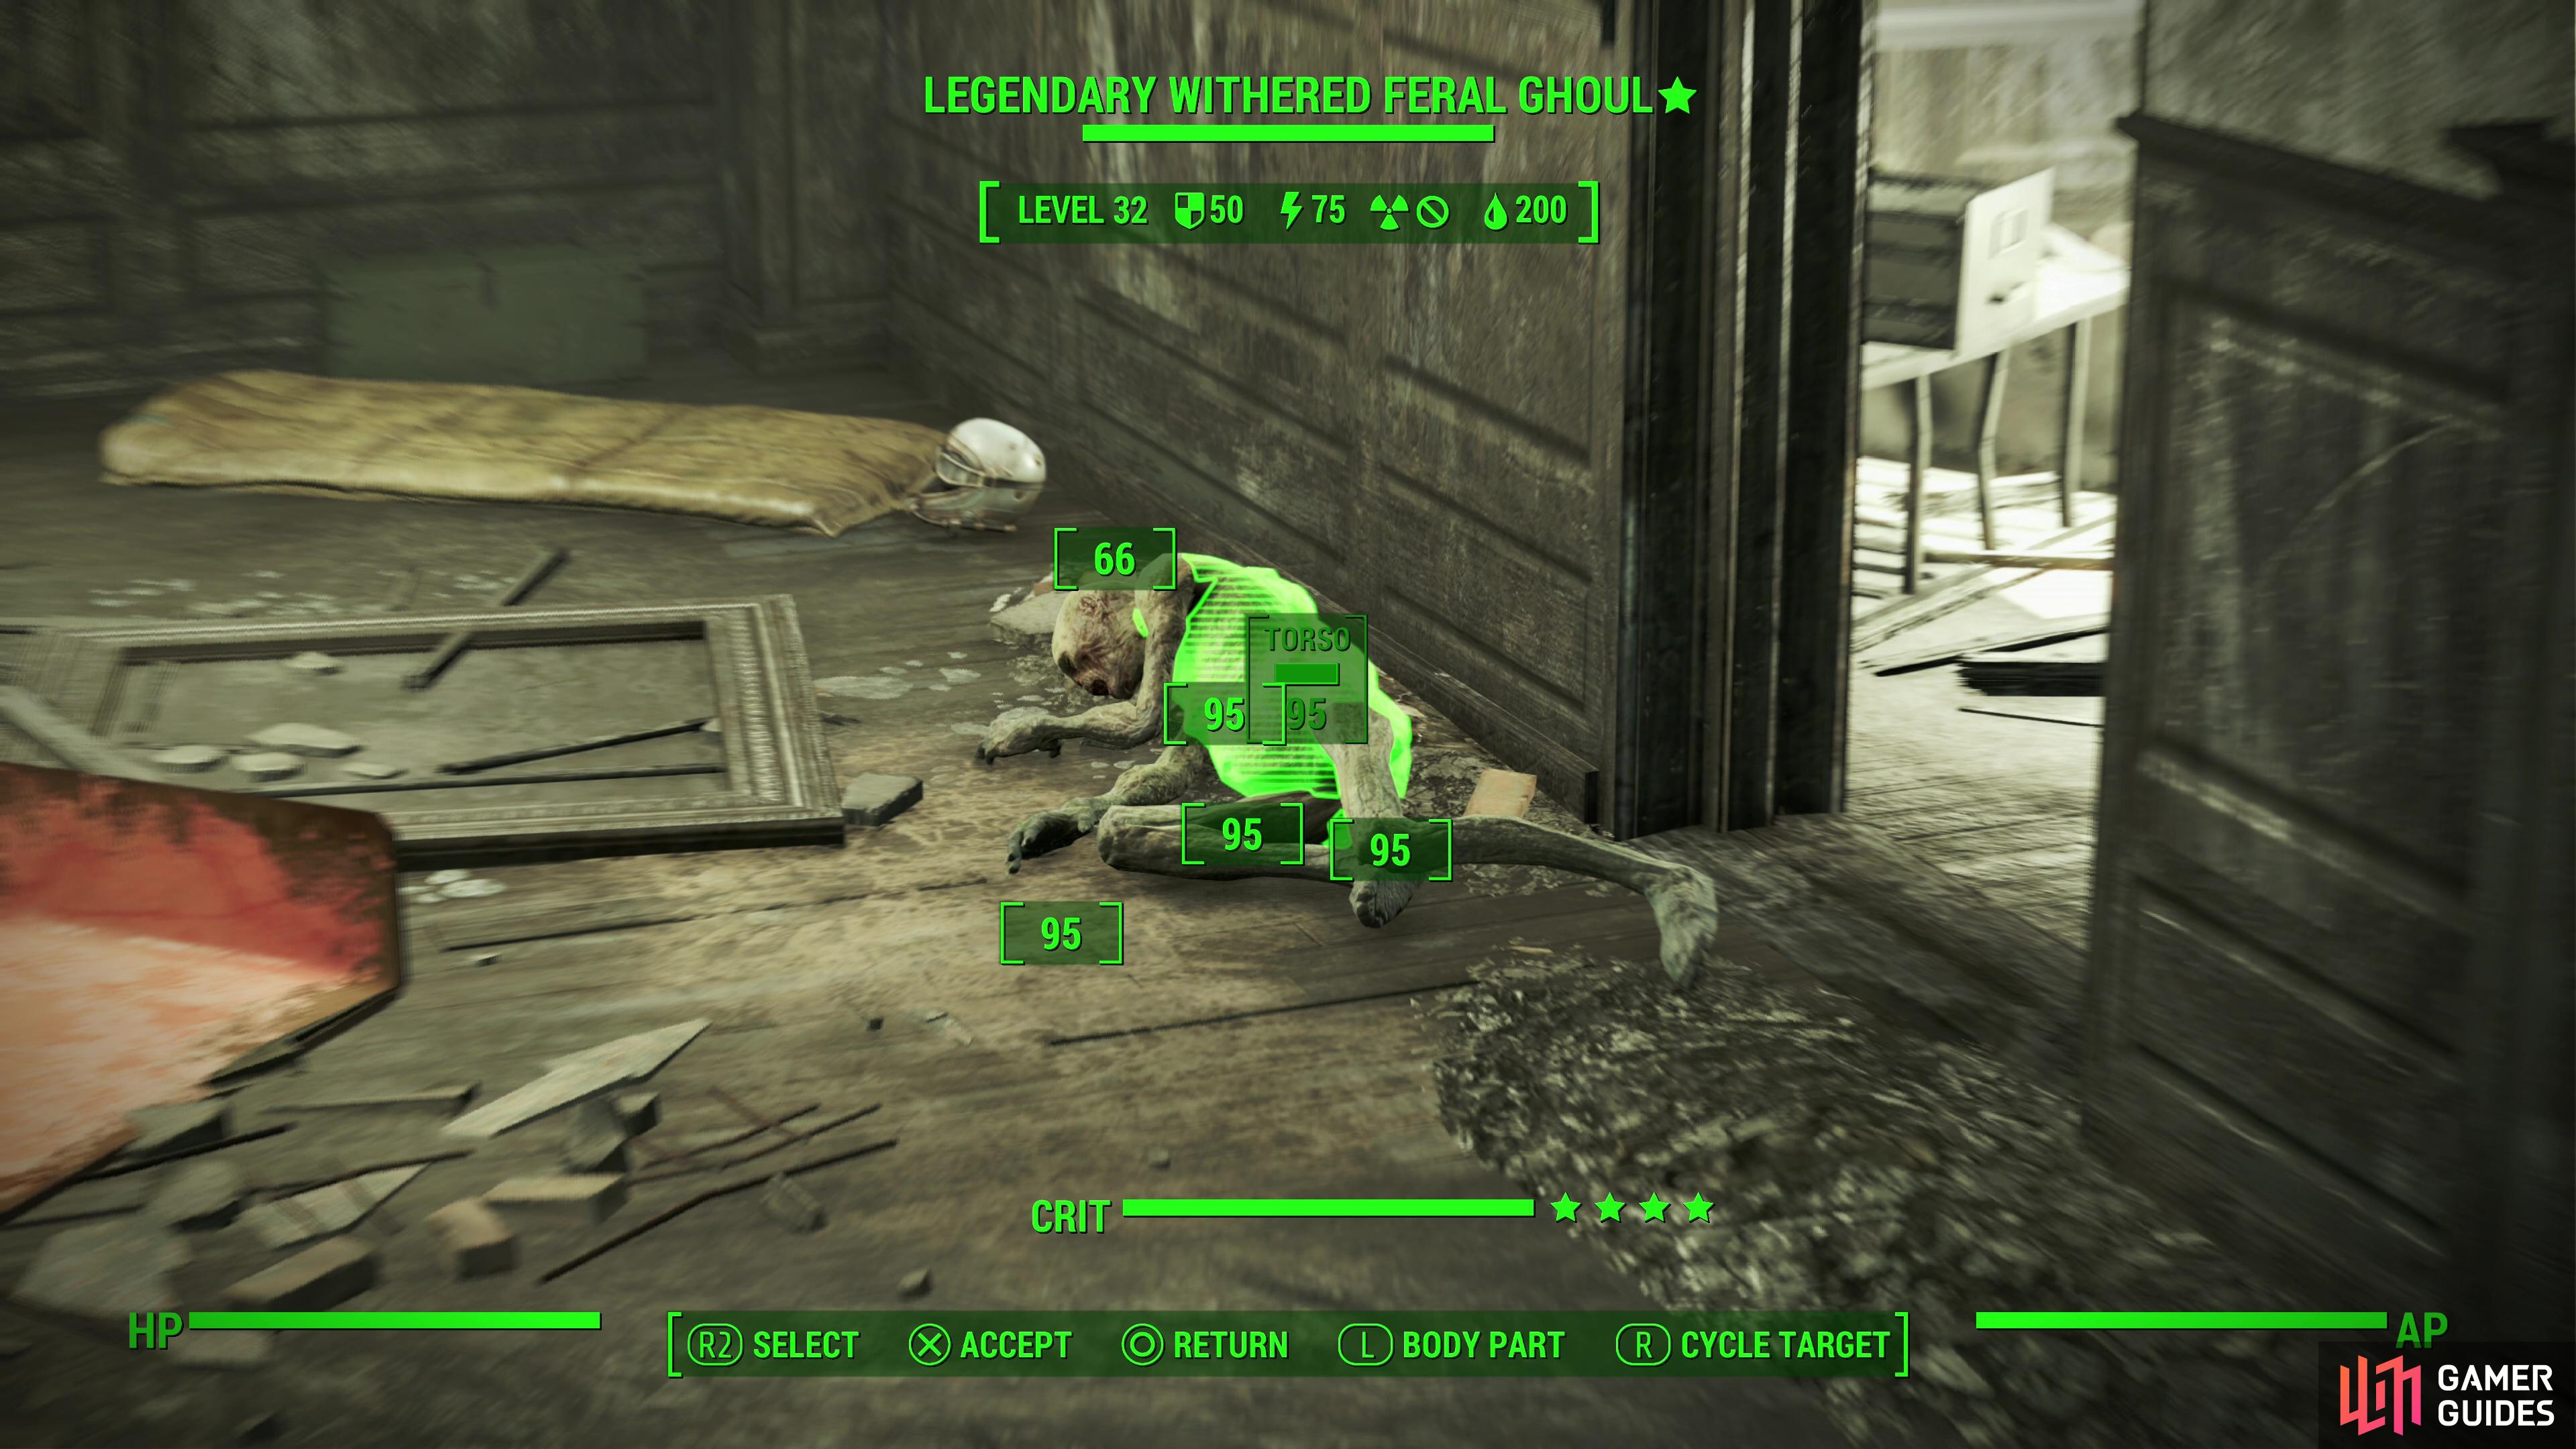
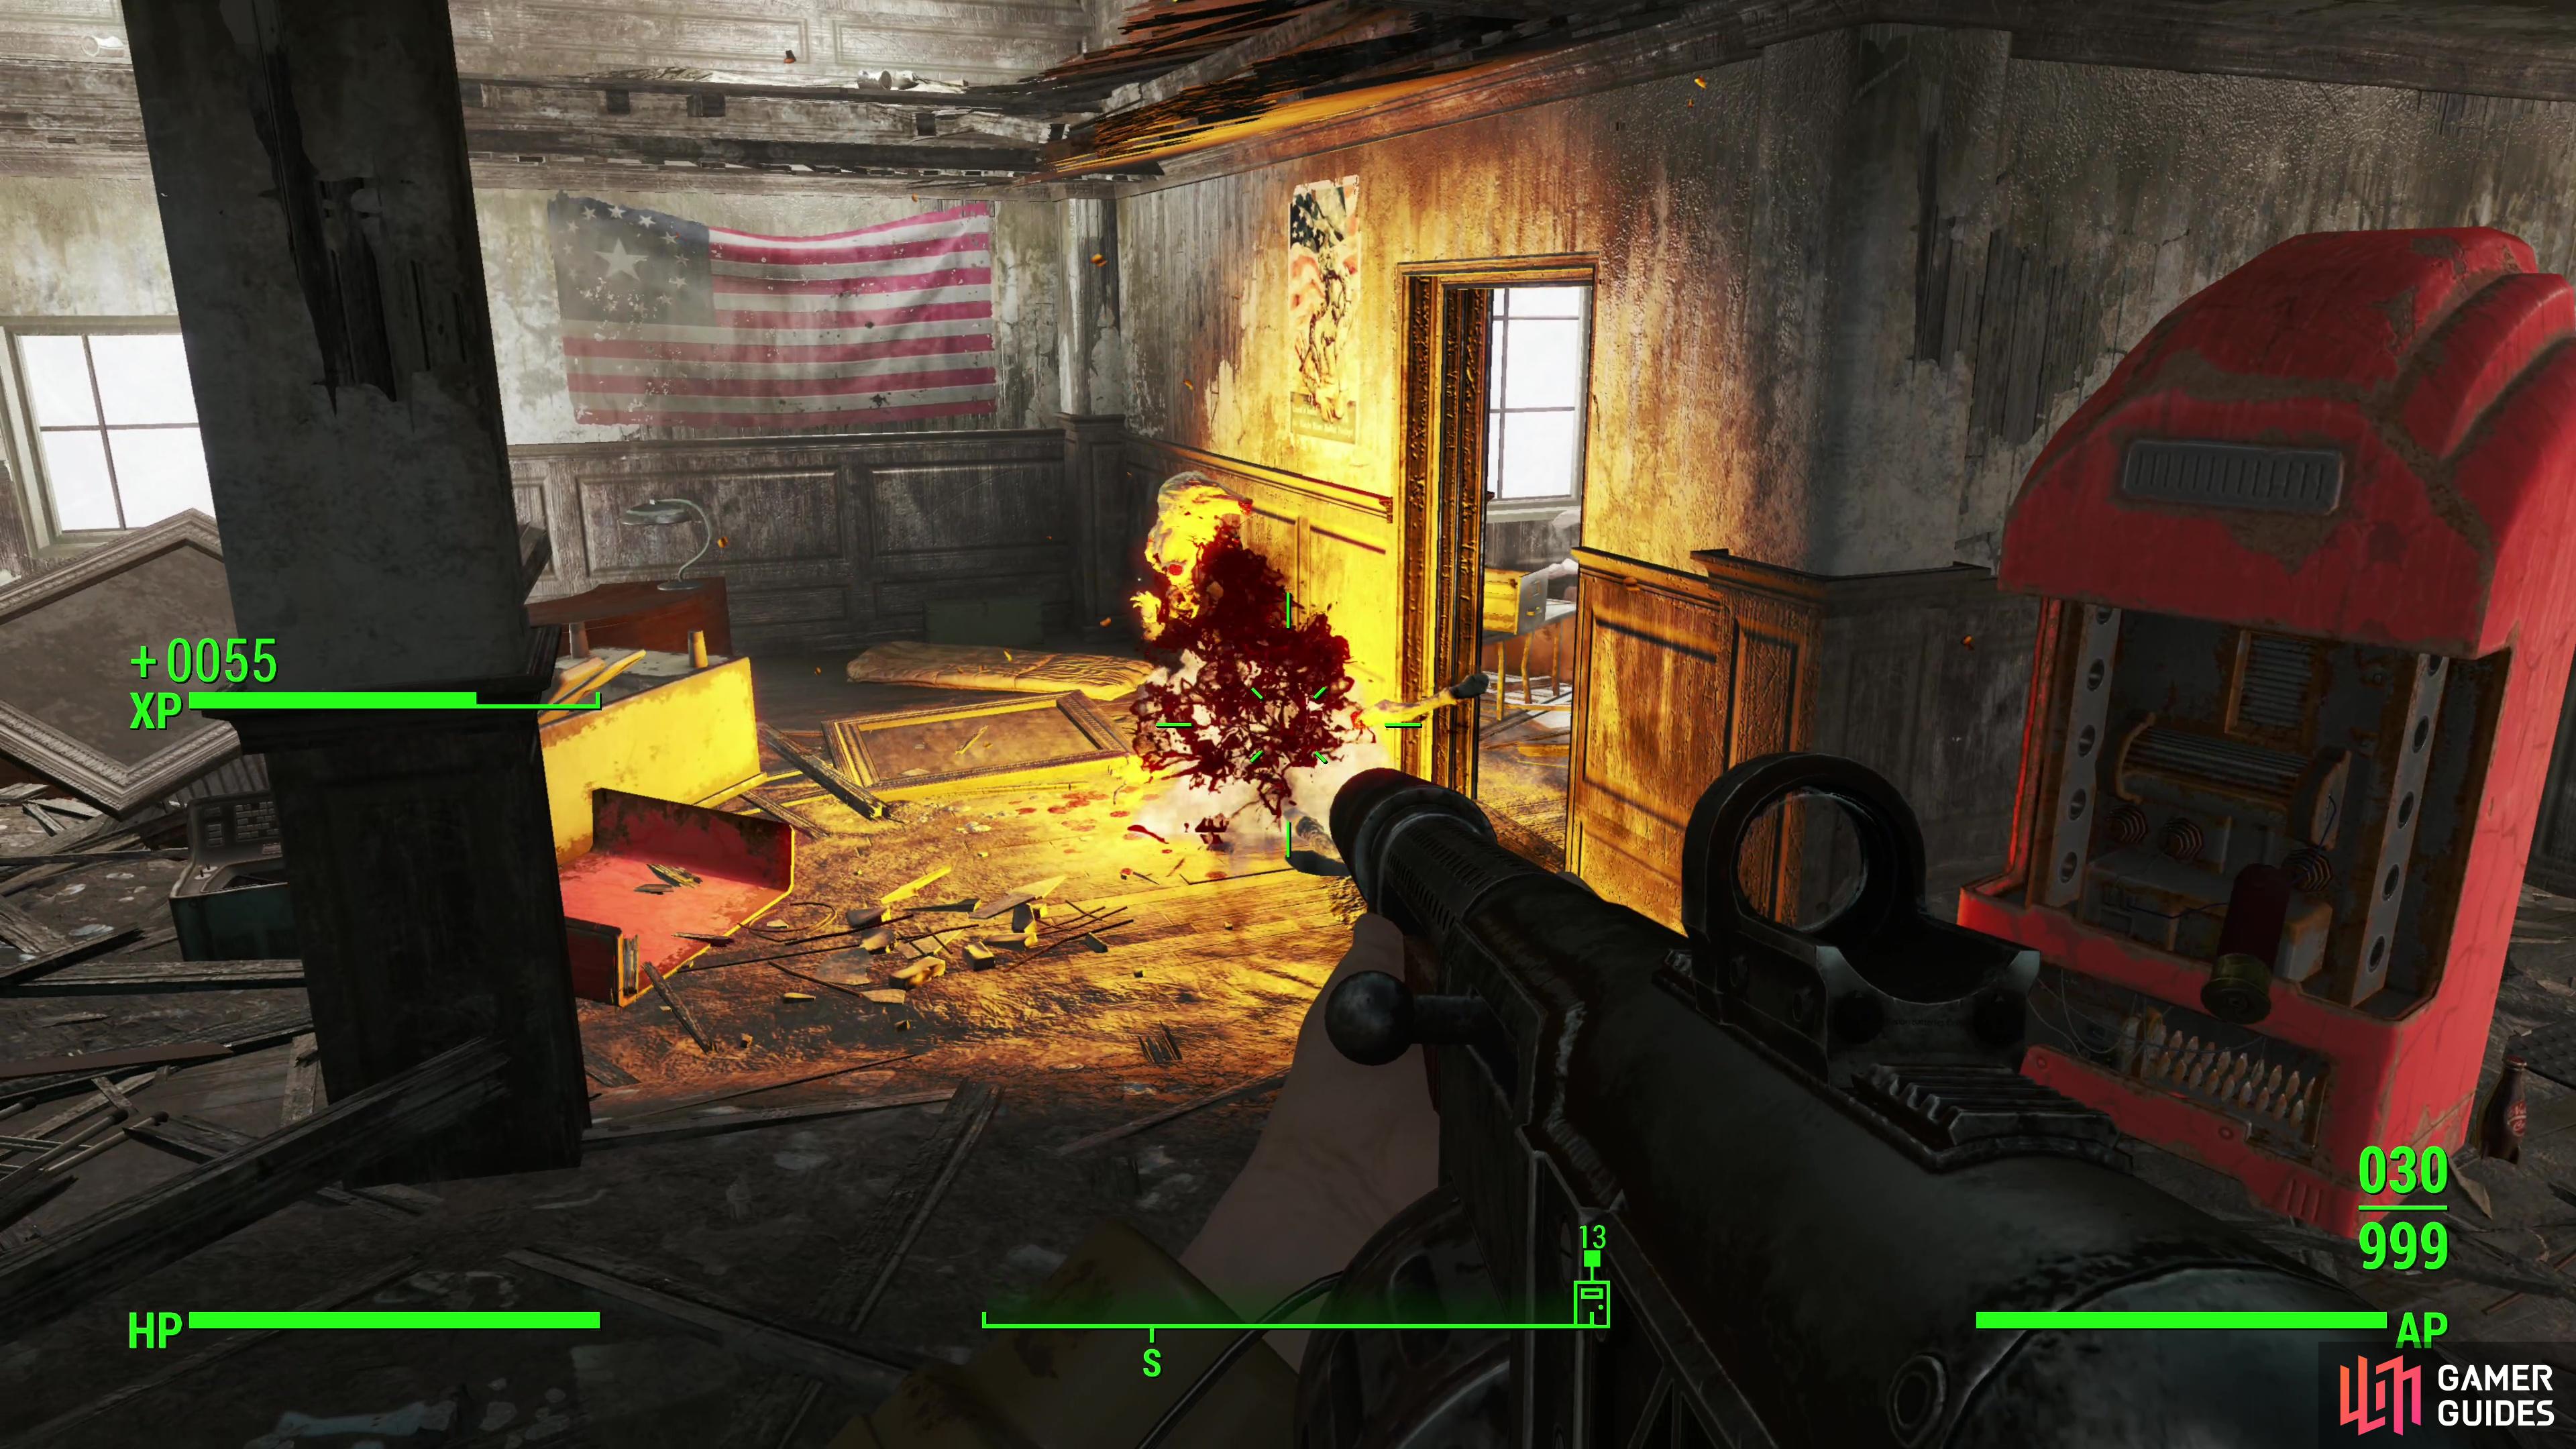
Head inside the National Guard Training Yard and enter the larger room to the south, where you’ll start your search for a legendary enemy. There’s usually one Ghoul hanging through a hole in the floor above you, two at the southern end of the large room ahead, one in a side room to the west, near the corpse of Knight Astlin, and one up the stairs to the east. Any of them can be legendary, and it’s completely random. Any of these enemies spawning as legendary is a win, and allows you to start farming them properly.
Farming Specific Legendary Items and Prefixes
Assuming you followed the steps above, made a hard save at Sanctuary and a quicksave outside the National Guard Training Yard and confirmed that one of the several Ghouls within is legendary, we can now move onto the main goal - getting a specific type of legendary item, with a specific prefix. There’s a good chance that the legendary spawn will remain even if you load your quicksave, so what you want to do now is kill the legendary enemy and see what it drops. If it drops an item you want - a specific armor piece or weapon type, great! You can move onto farming prefixes. For the sake of argument, let’s say we’re looking for a Combat Shotgun. If the legendary enemy does not drop an item type we want, reload the quickave and try again. Re-enter the building, kill the legendary, and keep repeating until you get an acceptable drop. In our case, a Combat Shotgun. You’ll save yourself a lot of misery if you’re flexible with this step, and if you want something strong, even if it’s not the best, a 10mm Pistol, Combat Rifle, Assault Rifle and Combat Shotgun are all good weapons to farm.
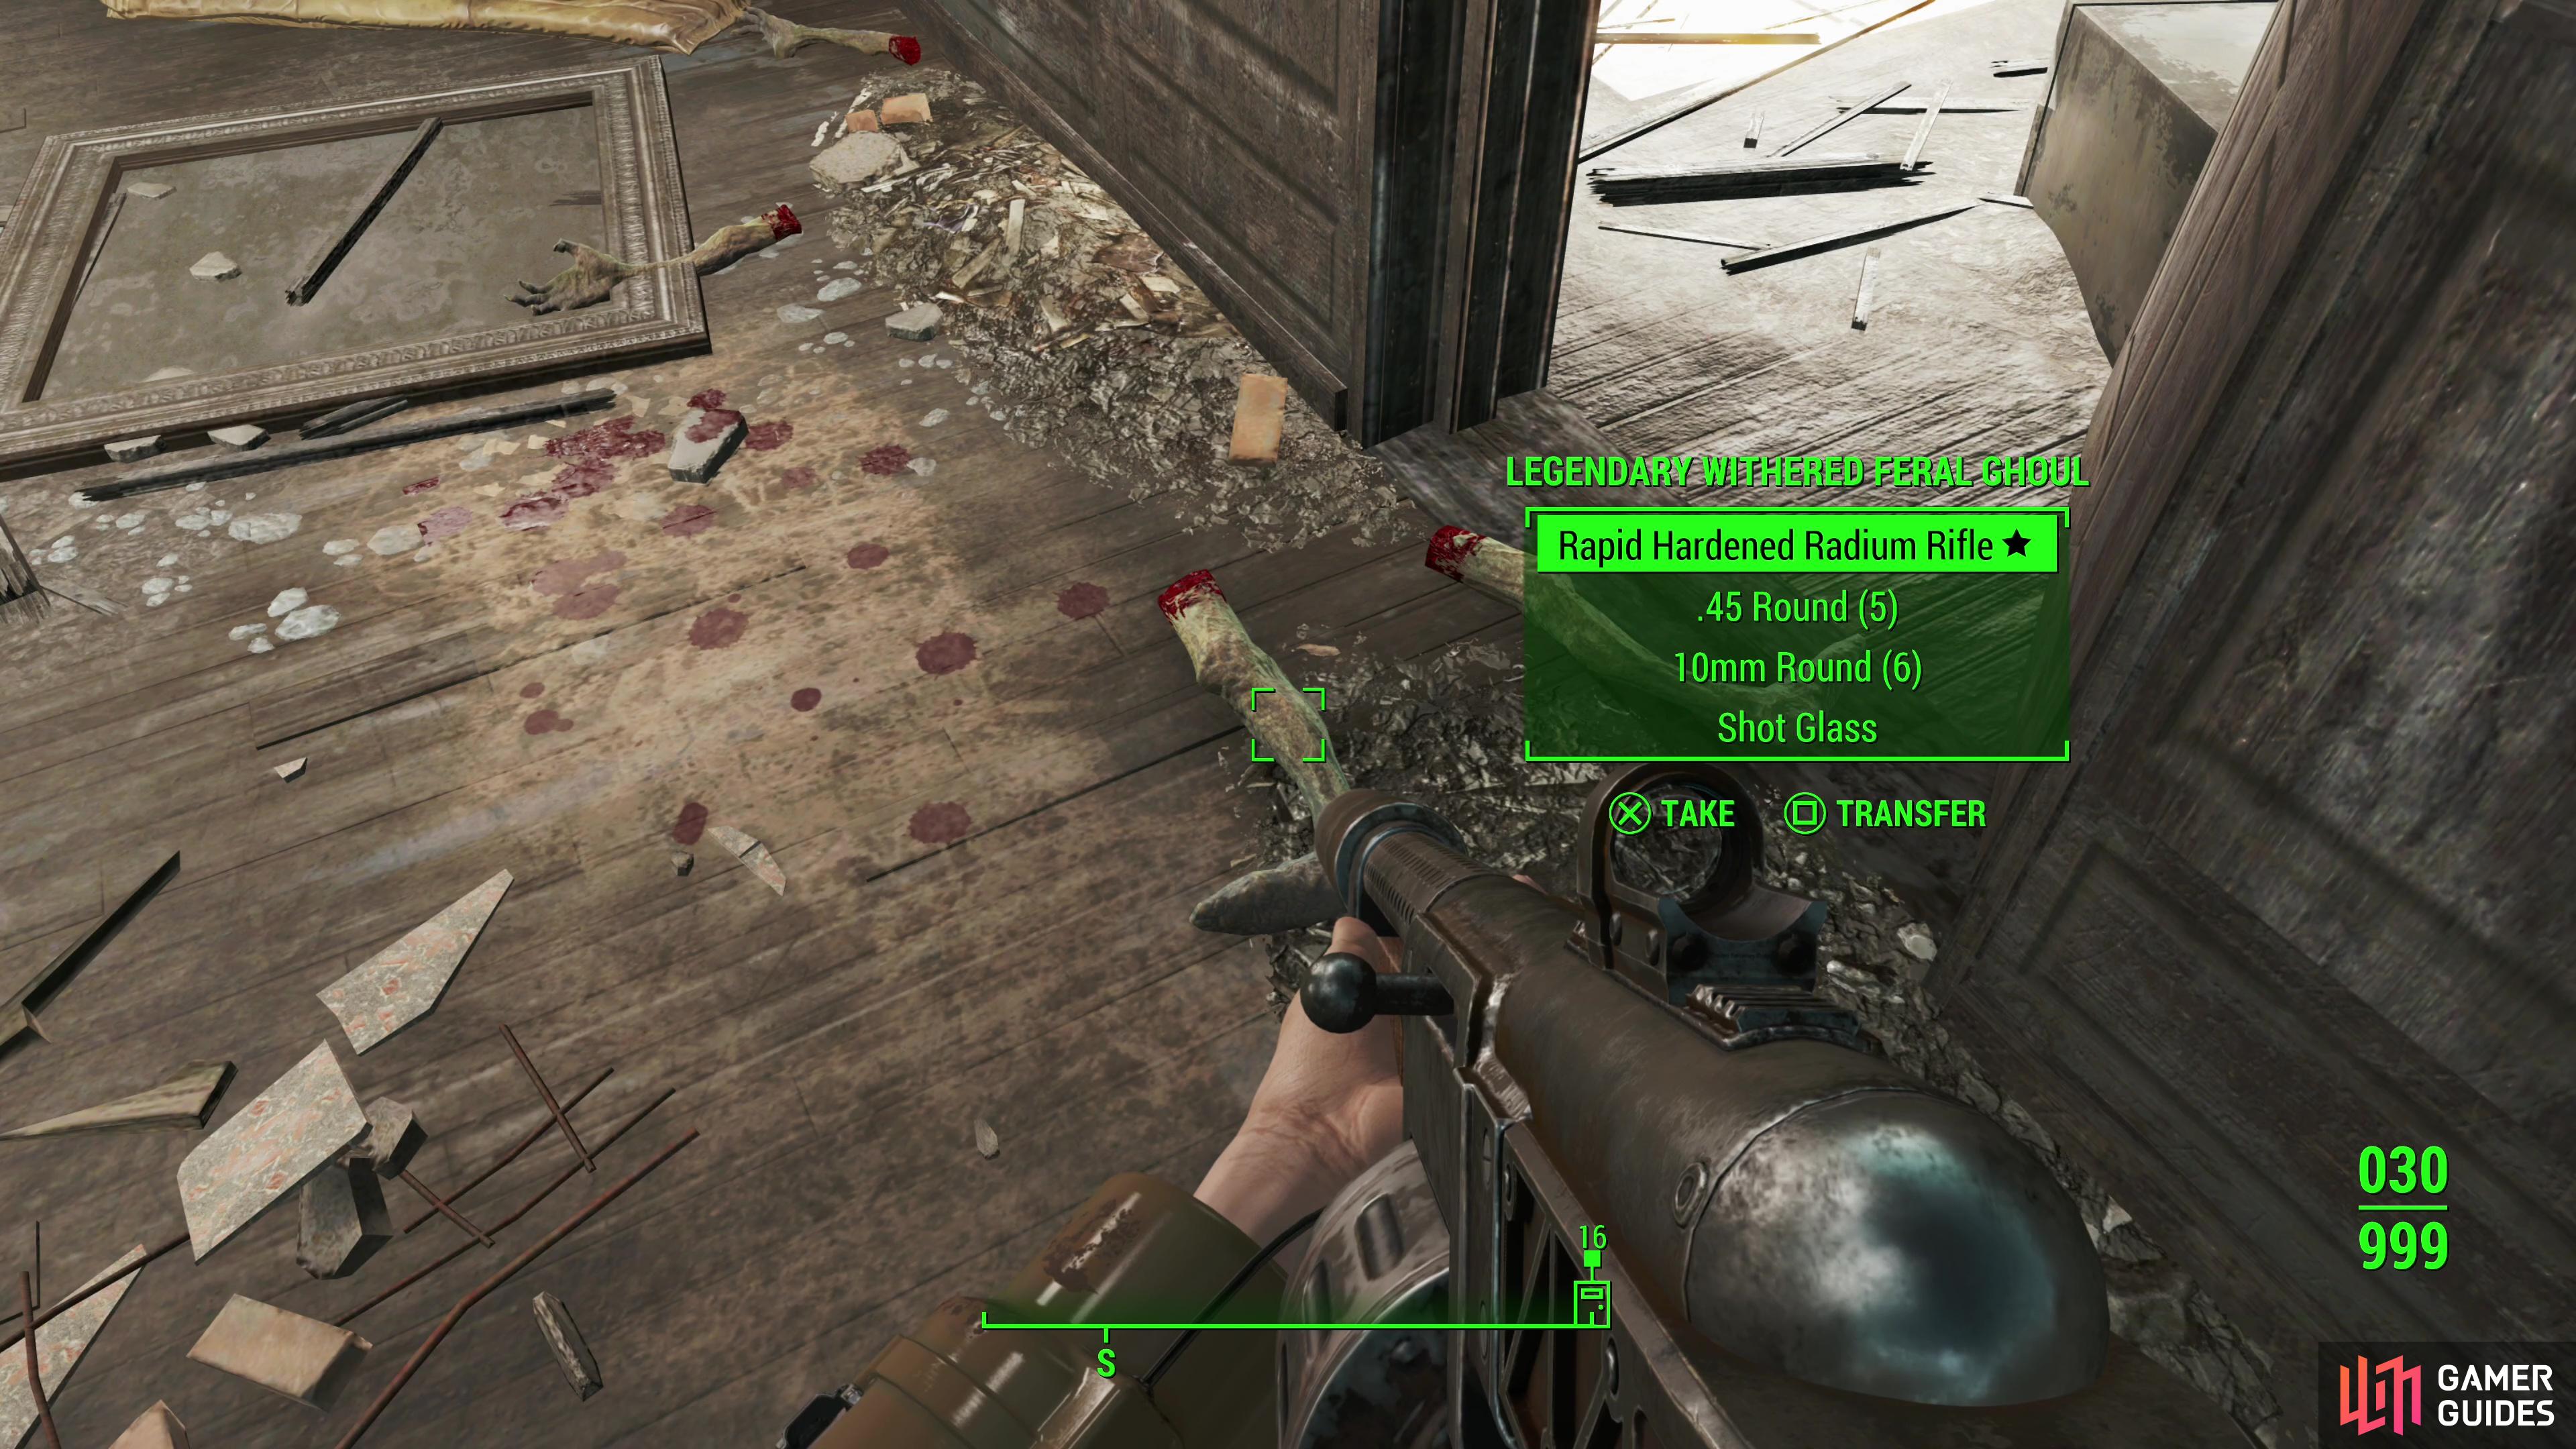
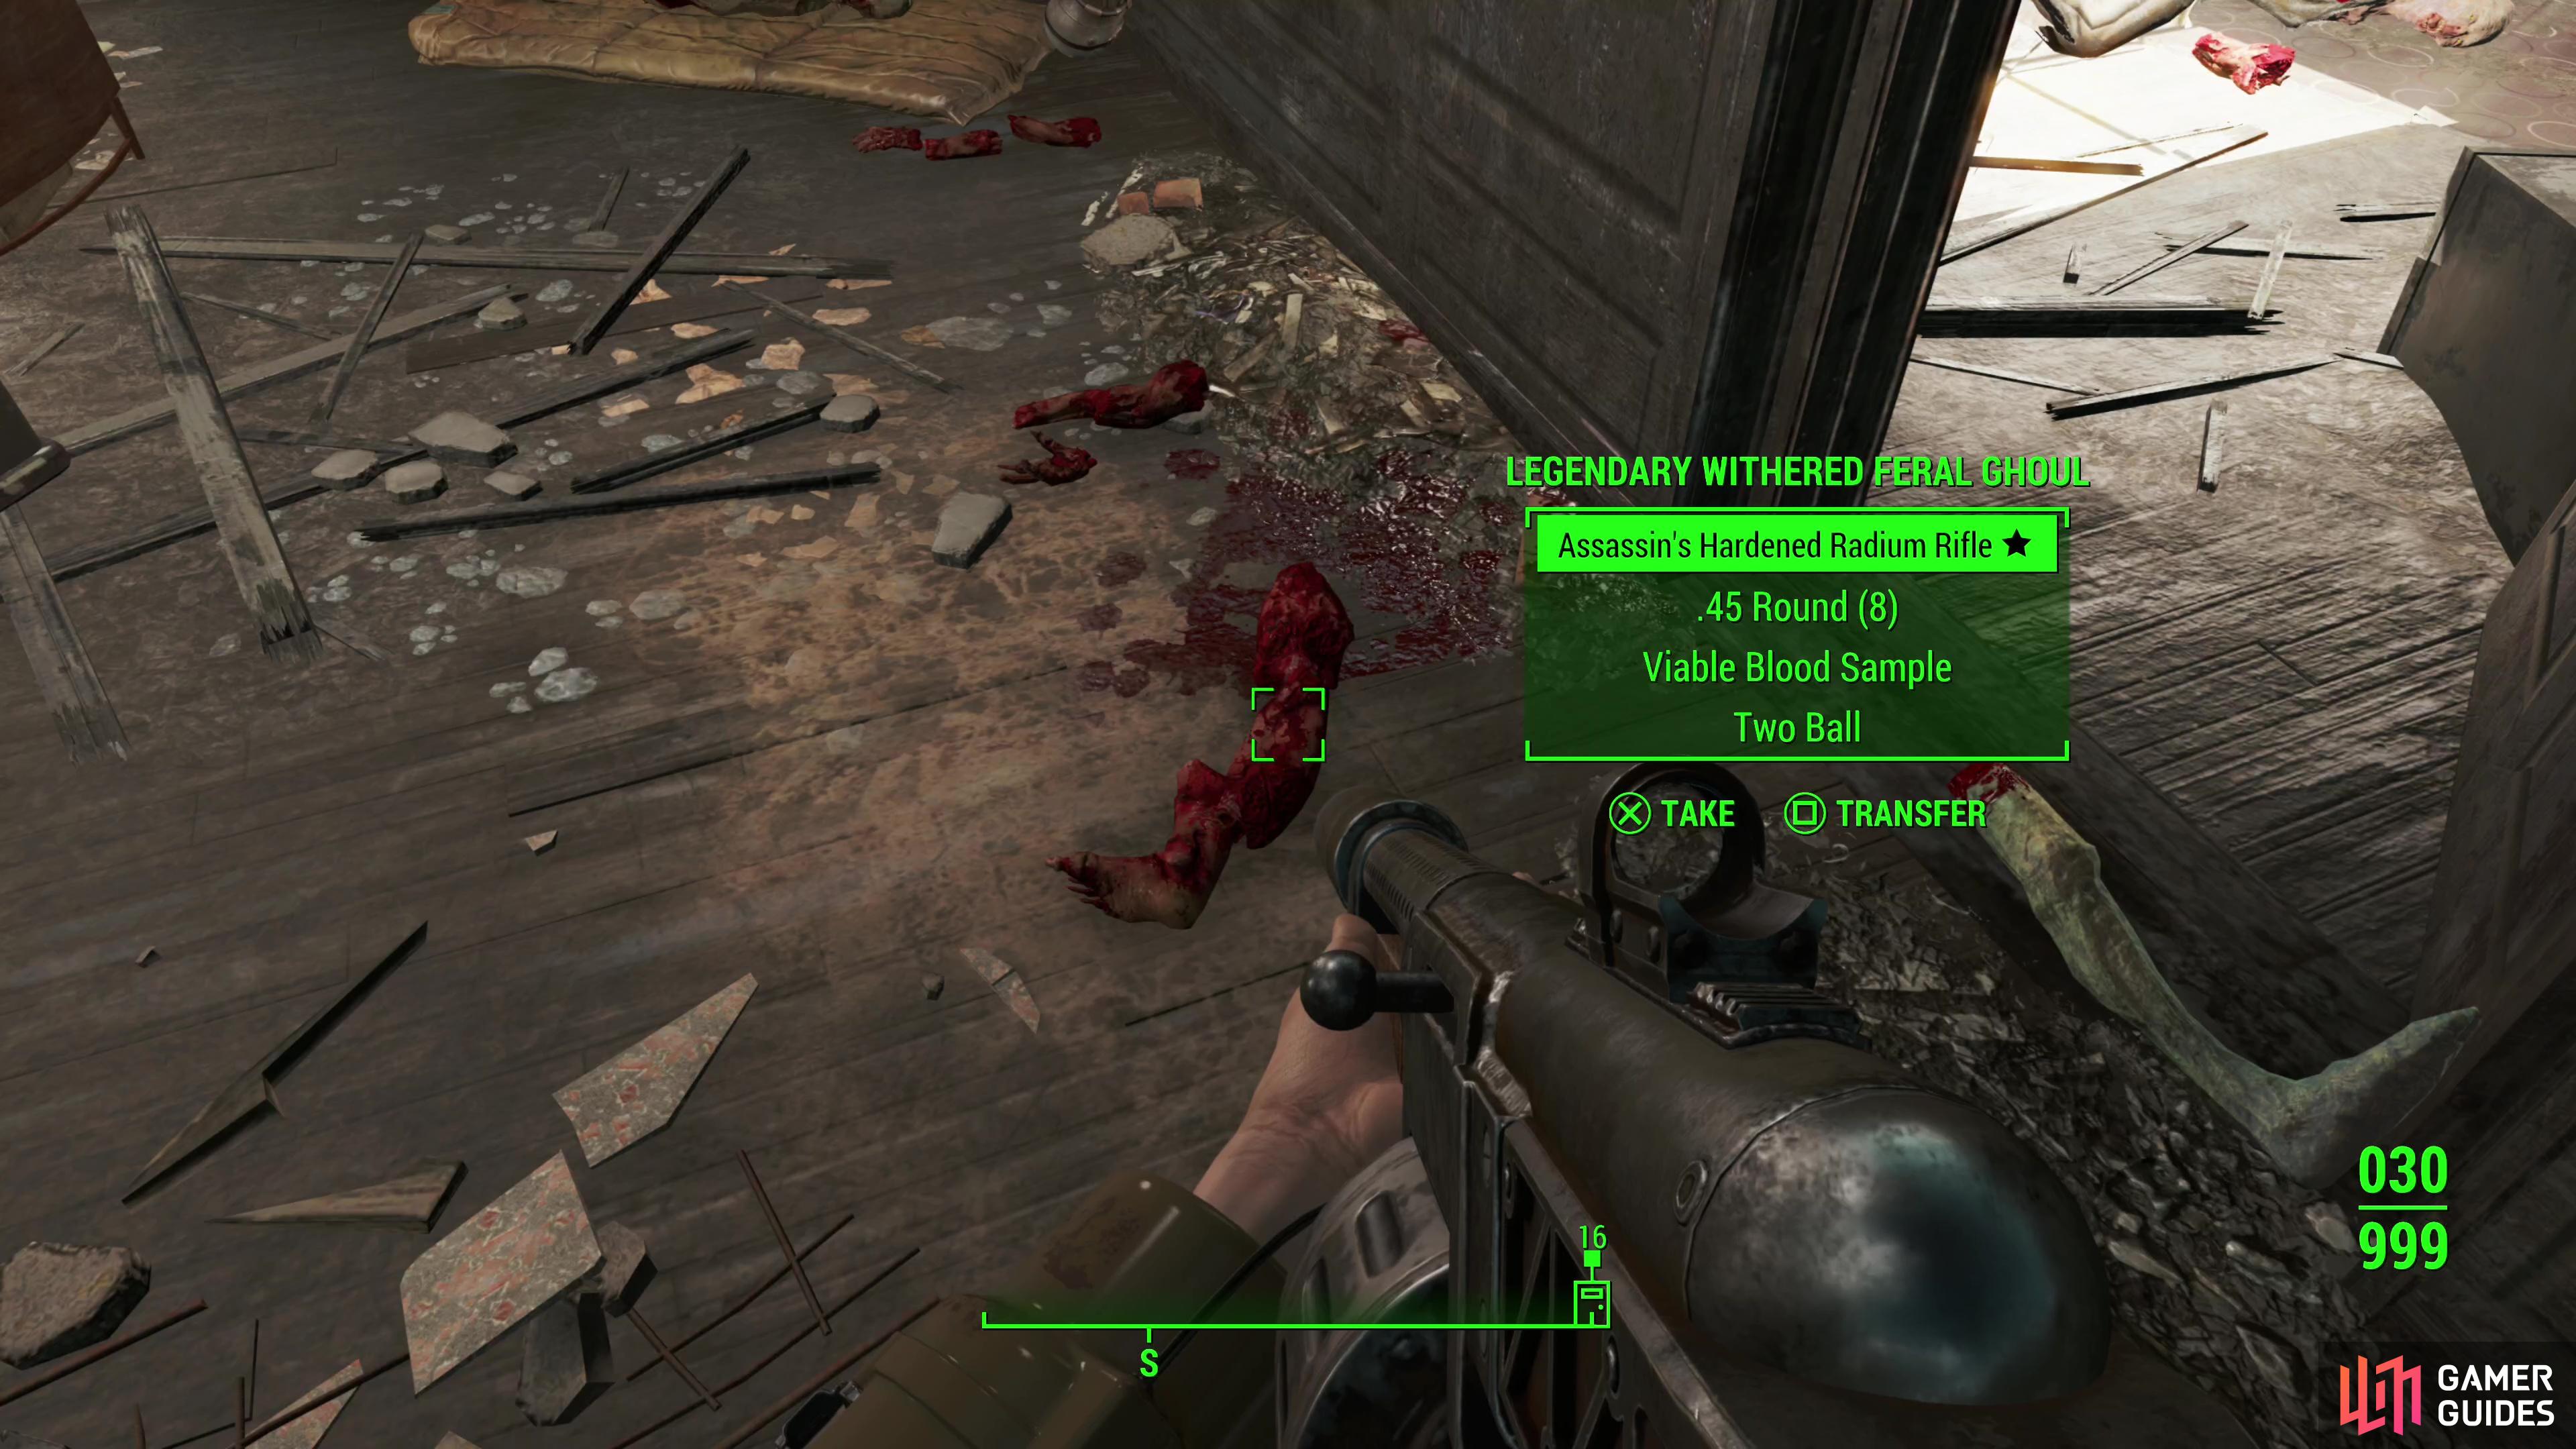
Now that you’ve got a confirmed legendary spawn that’s dropping an item you want, we need to set the prefix. The quicksave outside usually guarantees the legendary spawn, but zoning into the building is what sets the legendary item drop… but importantly not the prefix. Since the game autosaves when you enter the building, you now have three saves that, with some margin for error and wonkiness, are doing three different things for you:
- Hardsave at Sanctuary: Ensuring you have a clean spawn of the area you can use to spawn legendary enemies.
- Quicksave outside the National Guard Training Yard: Sets the legendary enemy spawn location.
- Autosave upon entering the National Guard Training Yard: Sets the type of item the legendary enemy will drop.
Kill the legendary enemy again and it should drop the same item, but with a random prefix. Let’s say we got a Combat Shotgun to drop. Now all we have to do is reload the autosave and kill the same legendary enemy over and over again and check its loot each time for Combat Shotgun with a different prefix. If it rolls up something gear, like Explosive or Wounding, great! We’re set for the rest of the game. If not, keep reloading the autosave until you get what you want, or some RNG wonkiness happens and the legendary enemy despawns. This isn’t common, but it can happen, which is why we have saves at various stages in this process.
That’s all there really is to this process - a whole lot of manipulating RNG and save-scumming. It’s tedious and unfun, but once you get that sweet weapon with a god-tier prefix, you’ll be mulching everything that gets in your way.
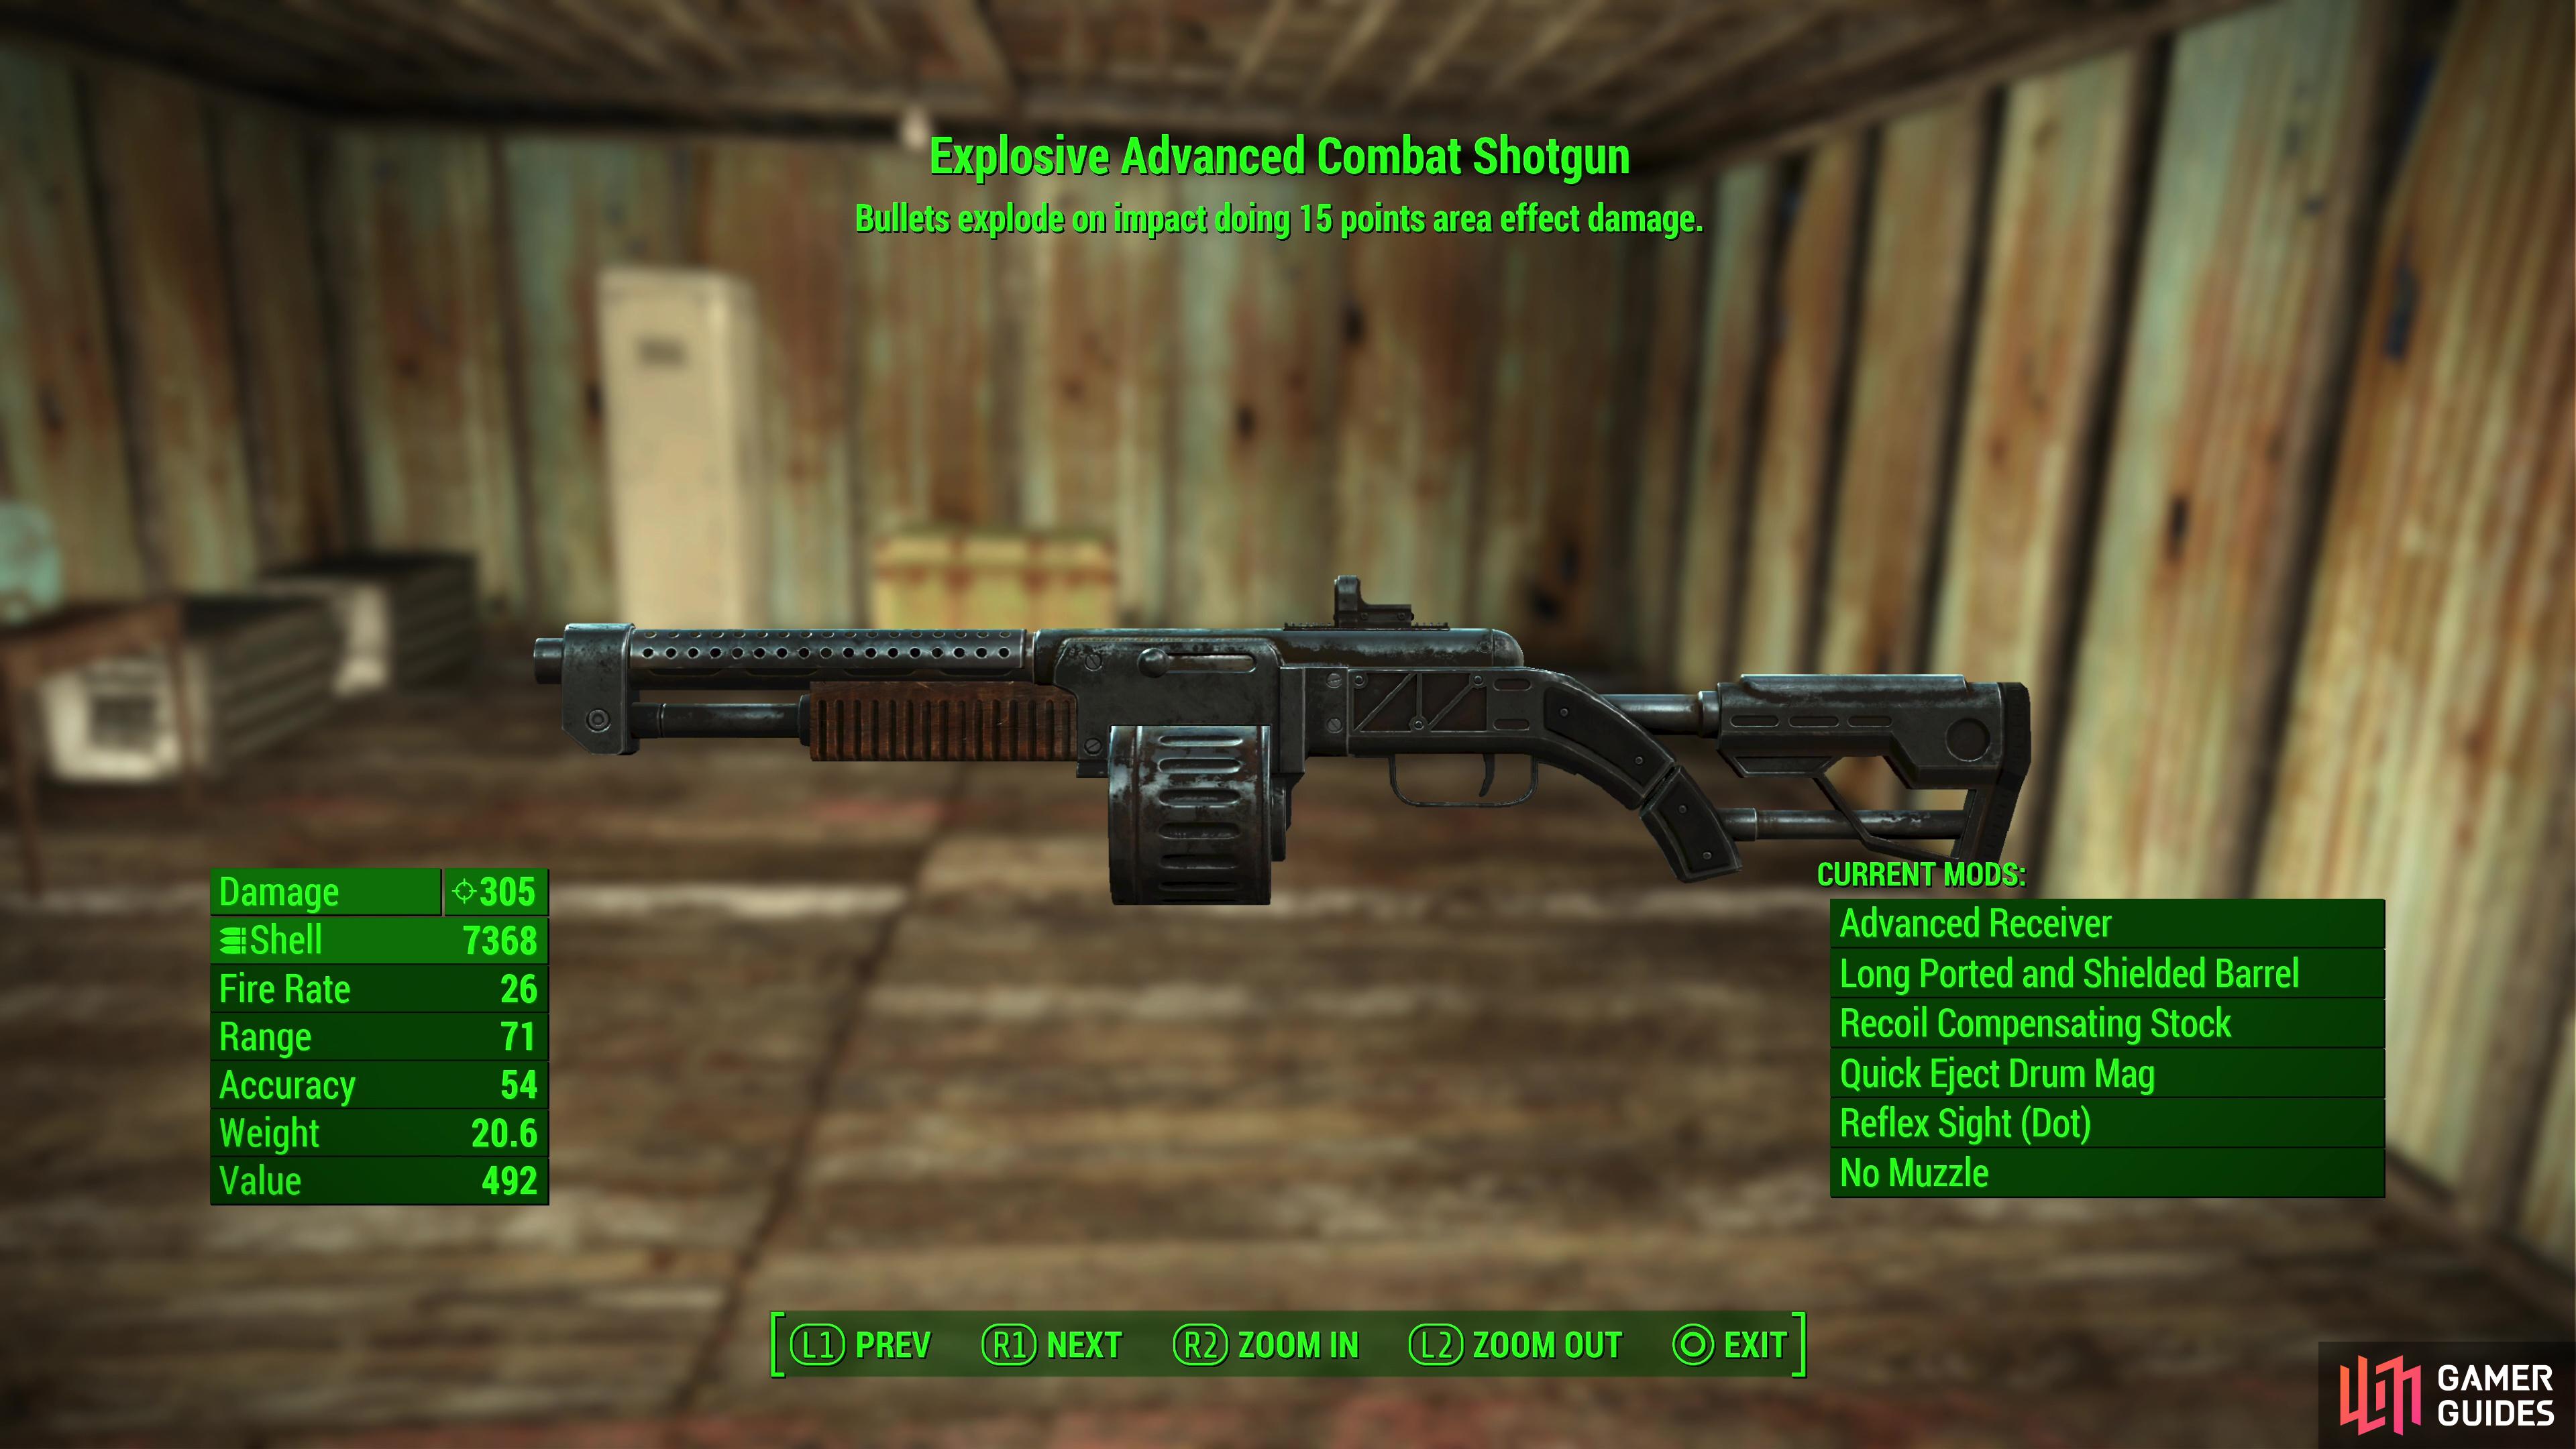
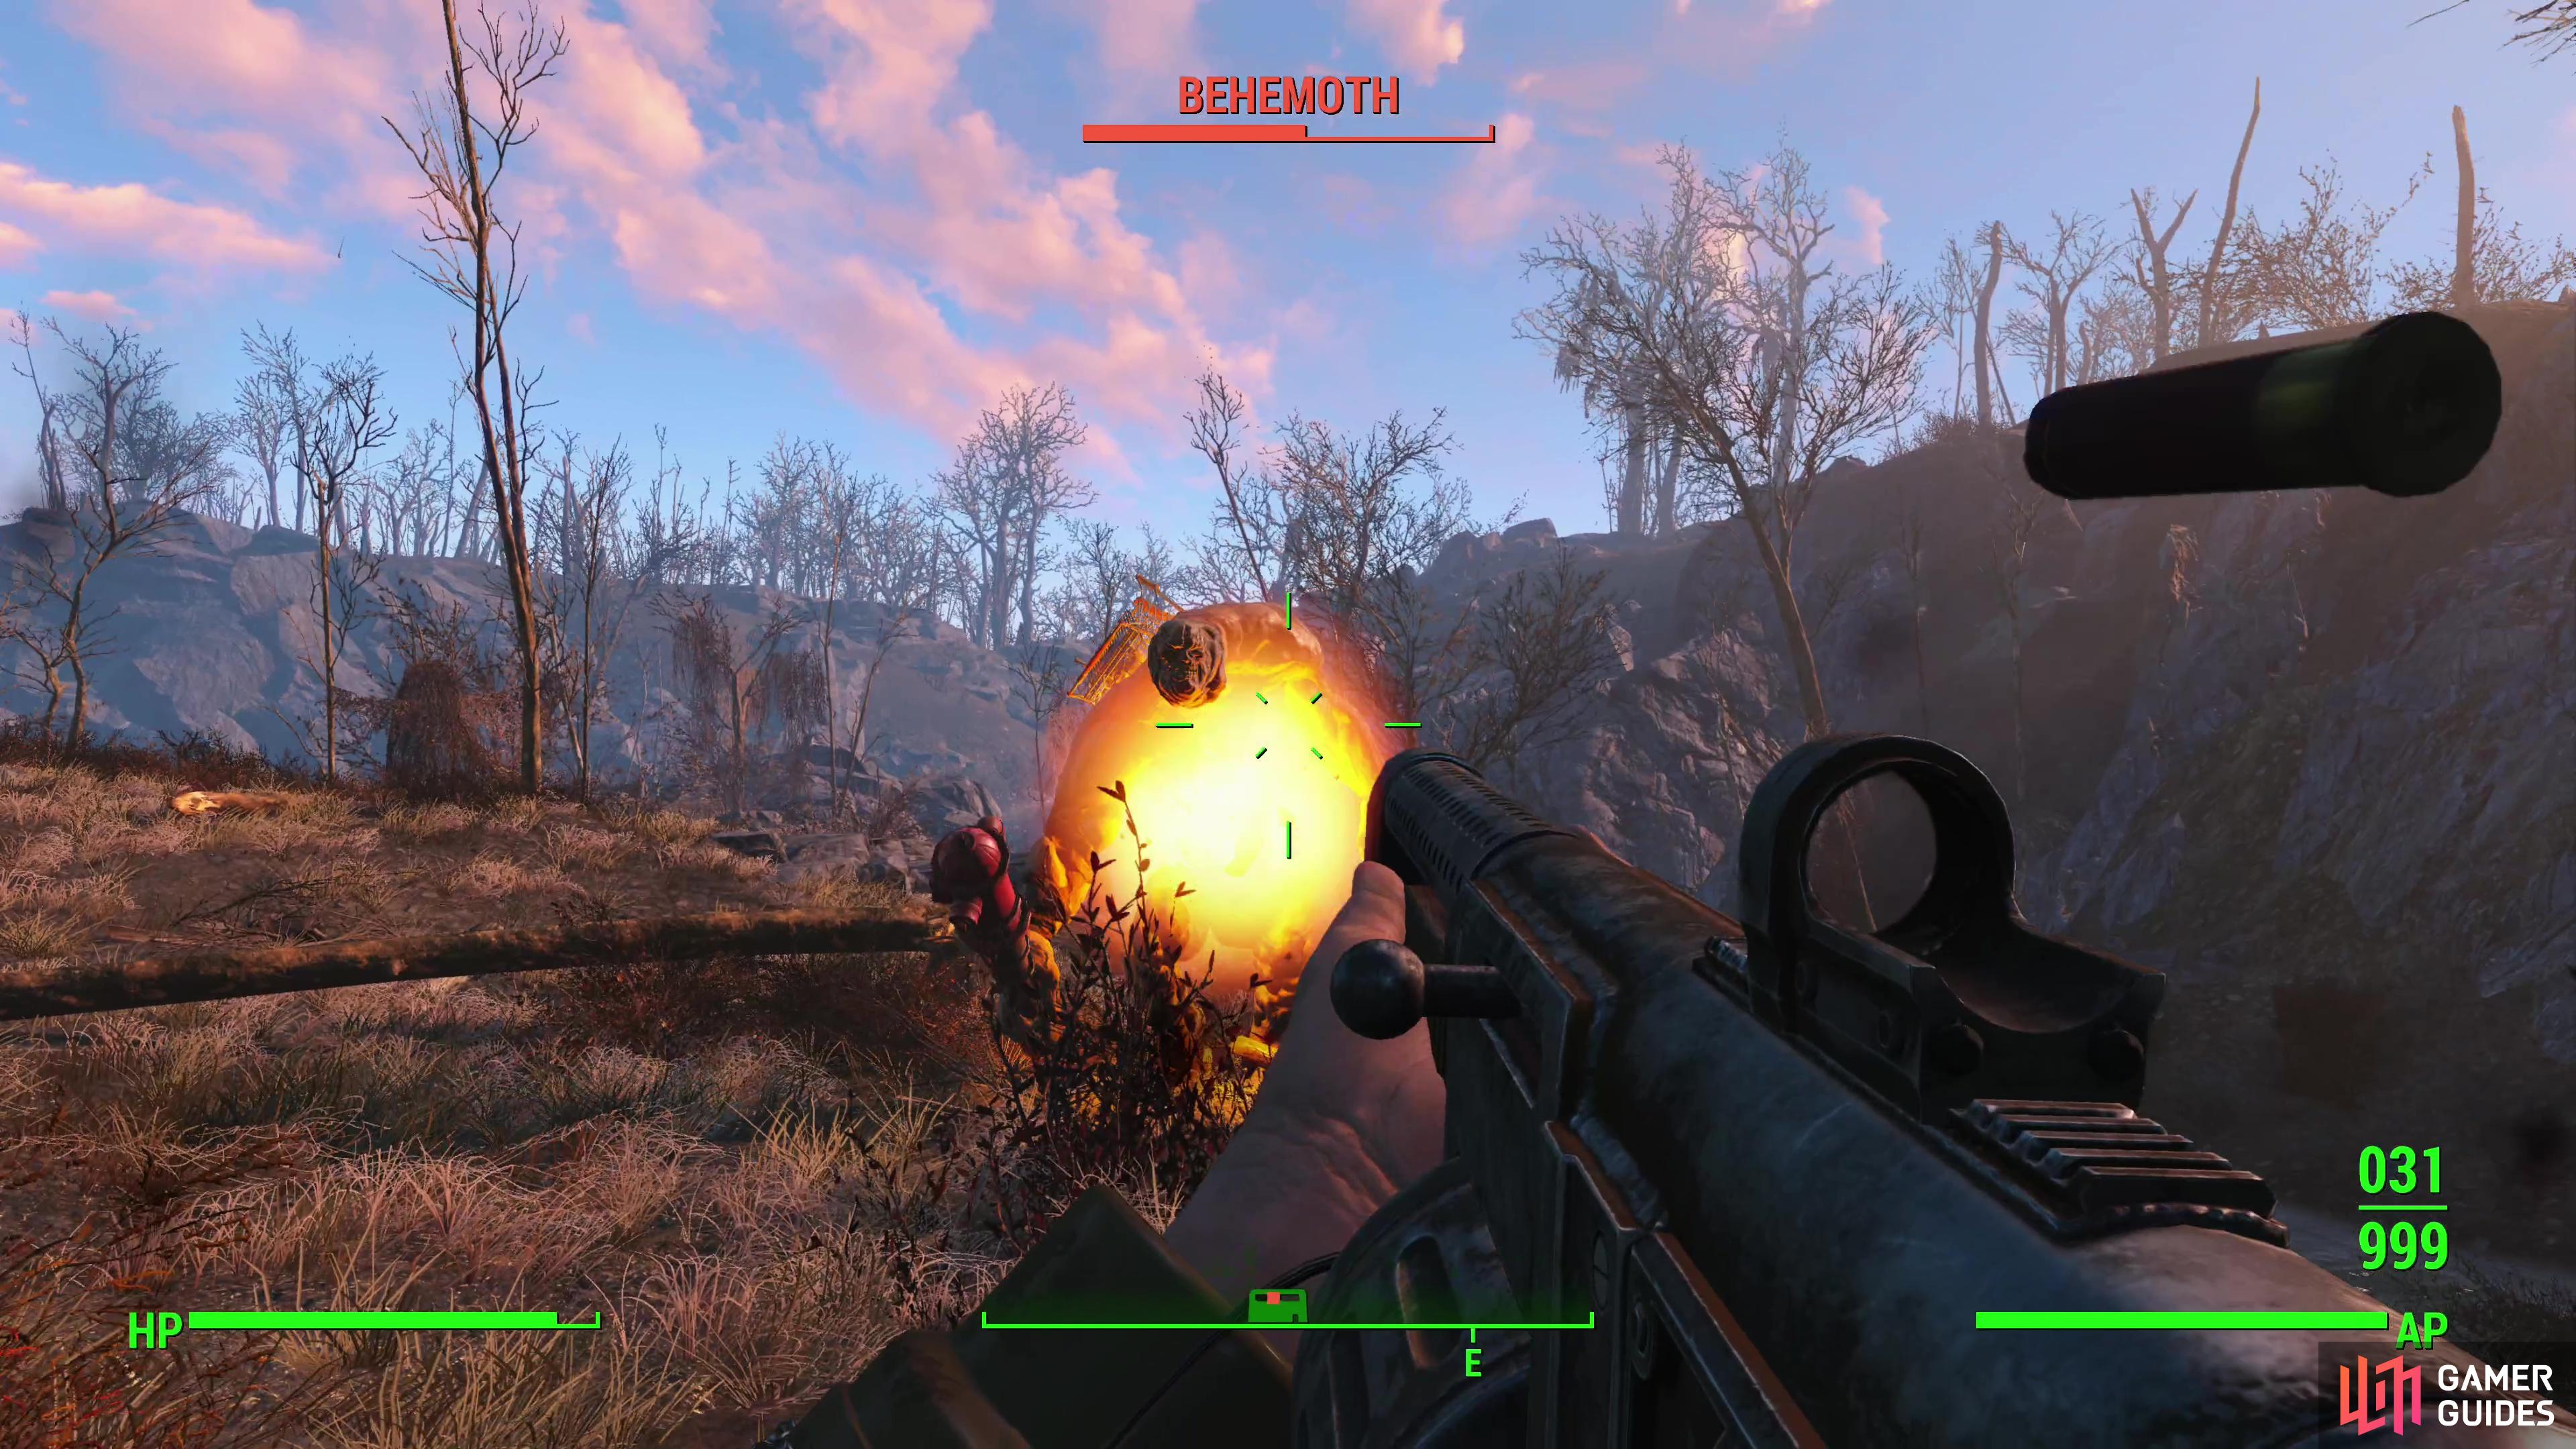

(1 of 3) The best weapon in the game is arguably an Explosive Combat Shotgun,
Best Legendary Prefixes
Now that you know how to farm, we’d be remiss if we didn’t tell you what to farm. First, armor is less important than weapons due to the supremacy of [Ballistic Weave]. Putting Ballistic Weave in two pieces of clothing (body clothing and a hat of some sort) will give you 220 DMG Resist, which is more pure DMG Resist than anything short of Power Armor will give you. That being the case, the type of armor you need doesn’t matter, save for minor issues like extra DMG Resist (trivial compared to the survivability that Ballistic Weave grants), weight, and perhaps most importantly, aesthetics.
-
Powered: Increases the rate at which your Action Points restore. Great for a VATS-heavy critical build, or for ensuring you have VATS (stamina) to use for sprinting, etc.
-
VATS Enhanced: Lowers the cost of attacking in VATS. Again, another boon for the omnipresent VATS mechanic.
Weapons are a bit trickier, as there is no Ballistic Weave crutch, meaning the type of weapon you use matters more. Generally fast fire rate weapons win the day in Fallout 4. That, or weapons that fire multiple projectiles at a time, like shotguns. This is due entirely to how several choice legendary weapon prefixes function, making weapons suited to exploit said prefixes massively more powerful than almost anything else in the game. On the plus side there are a lot of weapons that can be deadly with the right prefixes, and while Combat Shotguns and Assault Rifles top the list, 10mm Pistols, Combat Rifles, and even a humble pipe weapon can perform well if properly modded, although at some point lower base damage does make such low-tier weapons less appealing even if their fire rate is high. With that out of the way, the best legendary prefixes for weapons are as follows:
-
Explosive: Each projectile fired by the weapon deals 15 AoE damage in addition to any normal damage. This is boosted by Demolition Expert perk and the
 Explosive Bobblehead, boosting its per-projectile damage to over 30. On a fast-firing weapon like an Assault Rifle this adds a massive boost to damage, and a Combat Shotgun with an Advanced Receiver fires 8 pellets per shot, giving such weapons a boost of 120-240~ damage. Absolutely outclasses anything else in the game. Only downside is, the AoE doesn’t discriminate, so you’ll need to add Dense mods to your armor to mitigate the damage your own weapons will do to you. An Explosive Combat Shotgun is the best weapon in the game, bar none.
 -
Wounding: Each projectile deals 5 bleeding damage for 5 seconds. This damage isn’t resisted by anything, its damage is dealt per-projectile, and stacks with itself. Any fast-firing weapon will add stacking damage-over-time, and ten shots from a gun with this prefix will be dealing 250 extra damage over 5 seconds. Brutal. As with Explosive, a Combat Shotgun with an Advanced Receiver is firing 8 pellets per trigger pull, for 200 damage-over-time. Per shotgun shell. The lack of AoE is both a boon and a curse - you still have to hit your target, but you wont’ blow yourself up, either. Slightly less powerful than Explosive, over all.
 Sign up
No Comments