
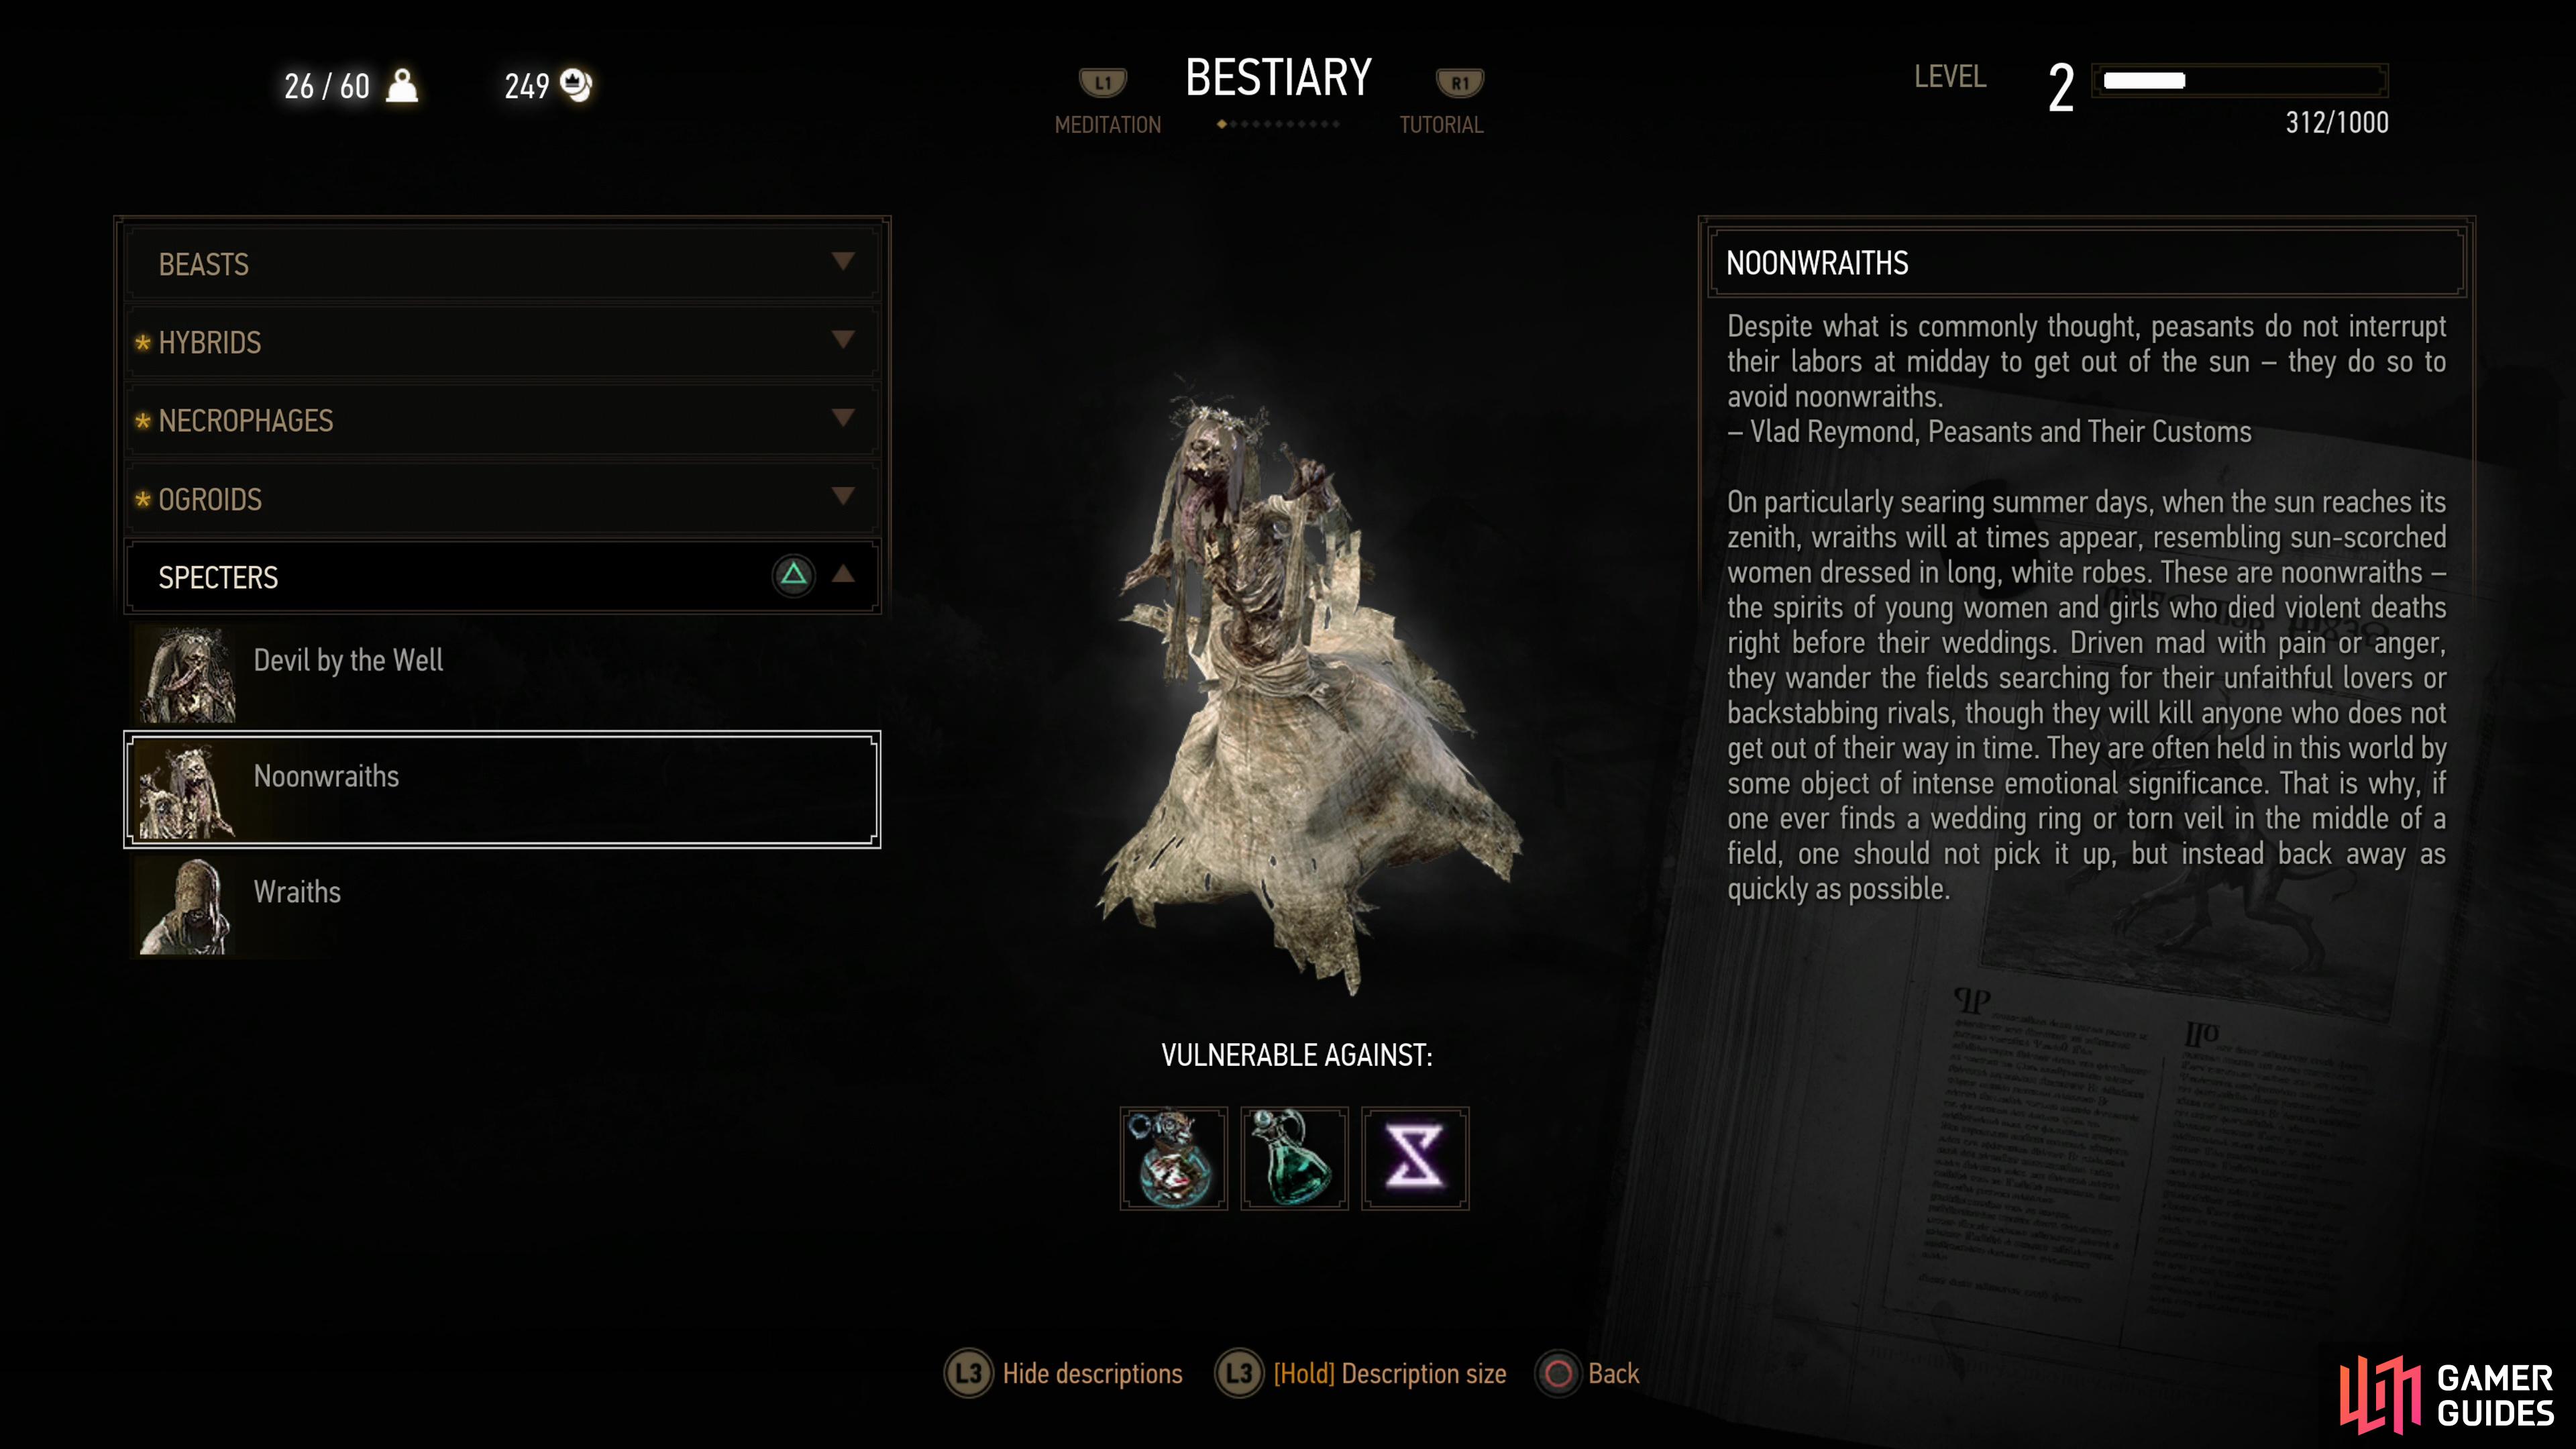
A Griffin stalks the skies over White Orchard, prompting the commander of the Nilfgaardian garrison to turn to a professional for help. While the Griffin may indeed be the most overt threat facing White Orchard, it’s not the only noteworthy monster in the area, and Geralt can pick up an optional contract to see to its demise. This page will cover the witcher contract Devil By the Well in The Witcher 3, including tips for investigating and defeating the Noonwraith.
Objectives
| Quick Search |
|---|
| Starting Devil By the Well |
| Investigate the Abandoned Village |
| Explore the Well and Find the Ornate Bracelet |
| Defeat the Noonwraith |
| Take Or Refuse Odolan’s Reward |
Starting Devil By the Well
To start Devil By the Well you can grab the Contract: Devil By the Well from the notice board in White Orchard. Read it, then head to the large house west of said notice board to find Odolan. His daughter has fallen ill from drinking river water, which was polluted by all the corpses deposited during the last battle. According to a local herbalist, whatever she’s contracted requires her to stay hydrated, and the only source of pure water around is the well, which has been haunted for some time. Back when the river water was pure, this wasn’t an issue, but now… now the ghost must be dealt with, or the girl will die.
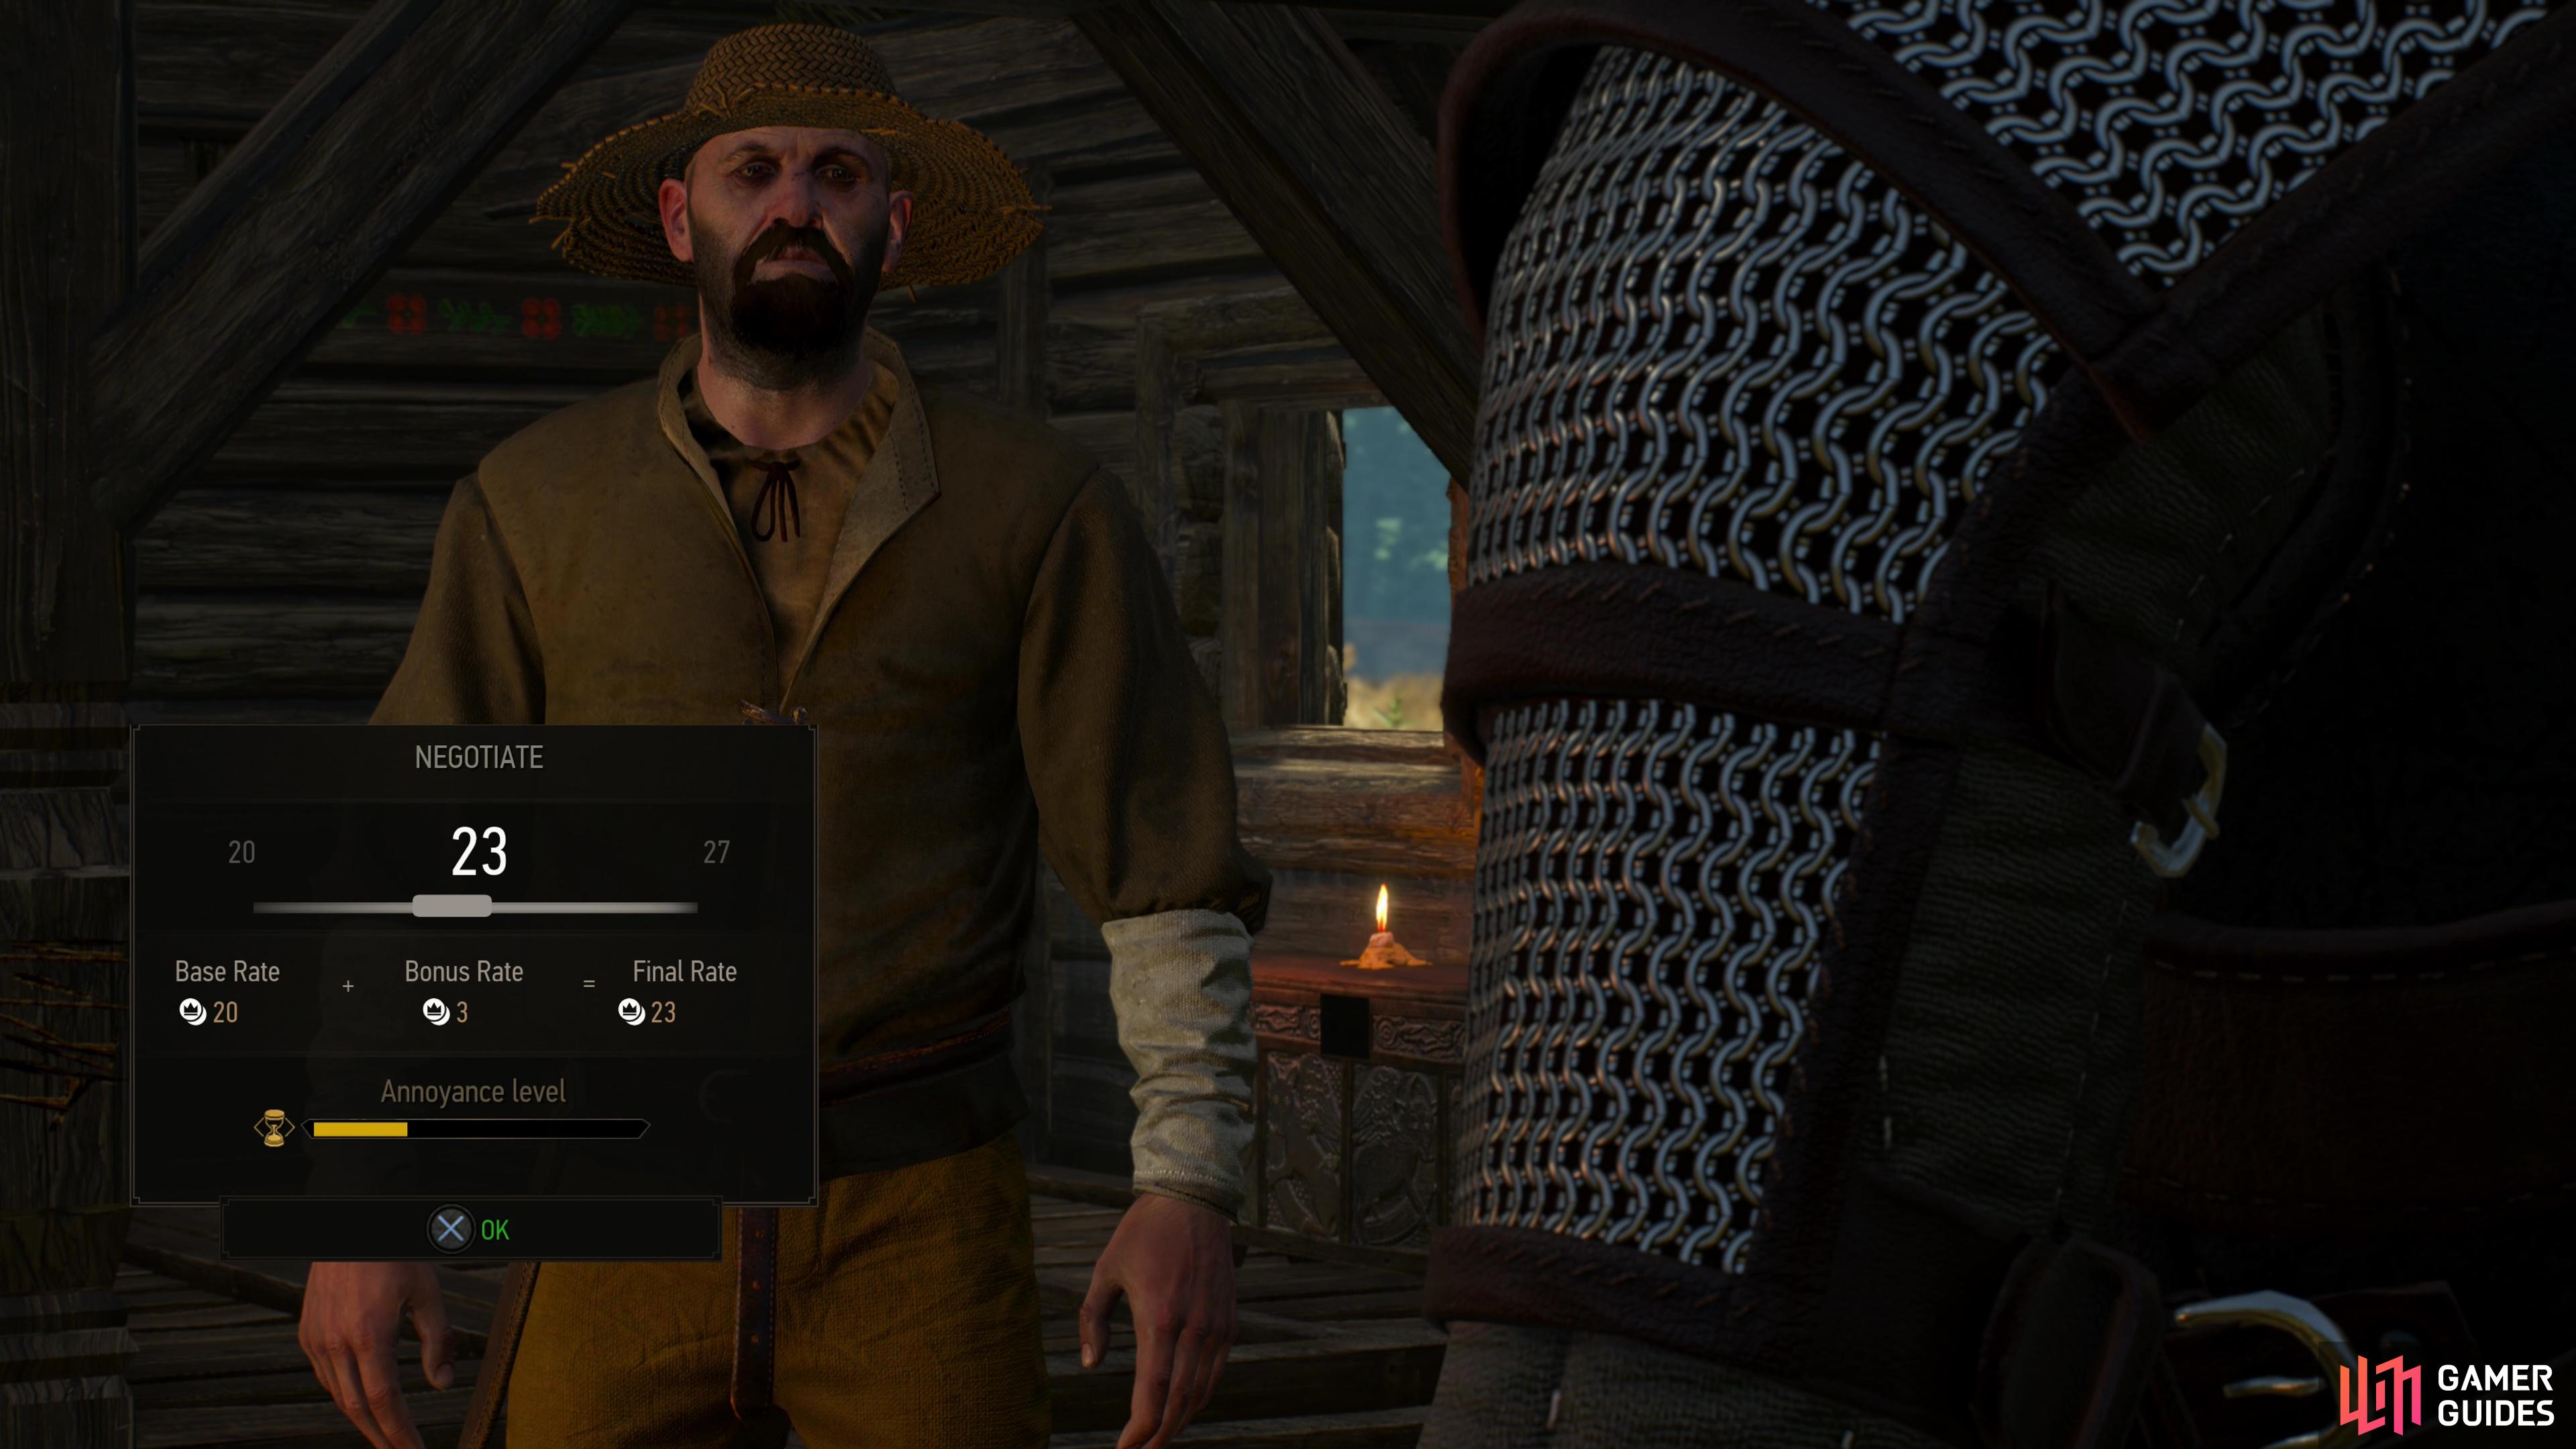
Talk to Odolan to start the contract. You can haggle for more coin, but doing so here is redundant, as the amount on offer is a pittance.
Pretty clear-cut case; this is witcher’s work. Ask the farmer to describe the ghost and he will. After that, you merely have to accept the job, haggle for more coin, or decline. Haggling is simple enough - the farmer will start at a base rate (in this case, 20 Crowns), and you’ll have to raise. Go too high, and the farmer will decline and get annoyed. Your goal is to start high, and drop the rate until you both agree. Every time you ask for more than the farmer is willing to pay, he’ll get more annoyed (by an amount proportional to the money you’re asking for). Note that this does seem to be a percentage-based check done under-the-hood: after reloading, a quest-giver might not turn you down for a reward they previously declined, or they may decline an offer they previously accepted. In this case, haggling probably isn’t worth the trouble, as it’ll at best nab you a few extra Crowns, but later on you can expect the difference in pay to end up being rather significant. Haggle as you will, but ultimately accept the quest.
Investigate the Abandoned Village
Leave Odolan’s house and travel south along the road. You’ll pass a house, and shortly south of that the path forks. The south-eastern path leads to your objective, so follow the south-eastern fork until you reach the Abandoned Village, complete with a signpost and everything. Head inside and have a look around, making use of your witcher senses to look for clues. Examine the scorched grass around the well, then investigate a crispy body west of the well. From this evidence, Geralt deduces the ghost you’re after is a Noonwraith.
Now turn your attention to the surviving houses, of which there are three. The western-most one contains a variety of loot, most of which is junk. Use the Aard Sign to clear some collapsed wooden beams so you can loot the south-eastern end of the house. In the central house lurks a pair of chests with better loot in it, notably alchemical and crafting components. Finally head over to the easternmost house. Under a wagon outside is a chest, and various sacks and a chest with minor loot inside await near the door. Venture inside the house to find a small wooden chest in the main room, then turn north-west to find a larger chest against the wall. Near this chest you’ll find a Yellowed Diary which, as Geralt suggests, might be useful.


(1 of 4) Search the grass and a corpse near the well to identify your target.
Time for some reading. Enter your inventory and read the Yellowed Diary. Seems an overbearing and cruel lord caused the former inhabitants of this area to settle here in the first place, and that a latter meeting with the lord - before which the journal ends - might have caused the Noonwraith to spawn. If Geralt’s hunches are correct, this ghost might be attached to a certain bracelet… Next look at the bestiary entry for Noonwraiths, which if anything lends more weight to Geralt’s suspicions.
It’s time to search for more clues, and fortunately, you need not look far. Turn around and search the corner of the room opposite where you found the Yellowed Diary and use your witcher senses to highlight some remains, which Geralt identifies as the body of someone who was stabbed, and died on the spot. A blood trail leads away from the scene however. Follow it using your witcher senses, searching once near the corpse, and again near the door to get Geralt to deduce that our search will lead us to… you guessed it, the well. Search a rope tied to the well to make a ghastly discovery. It’s no wonder this woman can’t rest easily, and while what happened to her was regrettable, she can’t be allowed to haunt the living any longer. Her bracelet ties her to this world, and it looks like you’ll have to hop down into the well to find it.
Explore the Well and Find the Ornate Bracelet
Hop down into the well where - despite Geralt’s pessimism - there’s enough water to break your fall. Once you’re in the water, dive to explore under the water and once submerged use your Witcher senses to locate the bracelet, then surface once the Ornate Bracelet is in hand.


(1 of 3) You’ll next need to investigate the well, and if the Noonwraith attacks, use Yrden and a simple attack/dodge combo to compel her to flee.
Climb up onto a ledge to the north, then go down a tunnel to the east to find another pool of water. Dive on in and swim to the north-east until you reach another large chamber. Search to the west to find a submerged chest with a variety of goodies inside, including the formula for the Water Hag Decoction. Follow the bubbles and surface to get a breath of air, then swim down a tunnel to the east until you surface in a small pond. Get more air, then search near the center of this pond, as there’s another submerged chest worth looting which contains some Cavalry Trousers and some coins. Geralt will suggest preparing for the Noonwraith, and it might not be bad advice. All you really need, however, is the Yrden Sign and a Silver Sword… although Wraith Oil won’t hurt.
Defeat the Noonwraith
From the pond where you surfaced, head southwest along a road to return to the Abandoned Village… after looting a hut just south of the pond, of course. When you’re ready to fight the Noonwraith, burn the body near the well by interacting with it, and the Noonwraith will show up. Her attacks are pretty basic; dodge around and wait for her to leave herself open. Once in a while she’ll vanish, blind you, and summon some decoys, who require only one hit to dispel, and should be attacked aggressively, as they’ll drain your life from a distance. She’ll take much more damage when she’s in the area of a Yrden spell, so cast it whenever you can and wait for her to engage you in the Yrden spell’s area of effect. Using the Strong Style aggressively, then quickly dodging back works quite well.


(1 of 4) When you’re ready to confront the Noonwraith, burn the corpse,
When she dies, loot her remains to gain some goodies. The drops are, of course, random (always including a Noonwraith Trophy , however). The Noonwraith Trophy will, when equipped, give you a 5% experience bonus from humans and nonhumans (quick, what’s 5% of next-to-nothing?). You can also score a Noonwraith Mutagen if you’re lucky, which will increase your Vitality when paired with the appropriate abilities. Another useful item she might drop includes Emerald Dust, which can be used to craft the Viper Steel Sword and Viper Silver Sword. The mutagen’s increase to Vitality is pretty paltry, though, and Emerald Dust will help you out more in the long run, even though you can just buy it from Willis and the Quartermaster, but that’ll set you back around 350~ crowns.
Take Or Refuse Odolan’s Reward
Return to Odolan and tell him the good news, and after prying into the shady history surrounding Claer and Volker he’ll be told that the herbalist, Tomira, may know more, and sure enough you’ll get some new dialogue options when you return to her. Before that, however, Odolan will come through with his end of the deal, offering you his daughter’s dowry as payment. If you accept you’ll get whatever paltry coin you agreed upon - likely 25~ Crowns at the high end. If you refuse payment, you’ll look like a nice guy, but Odolan won’t let you leave without a reward and will give you an Amethyst instead.
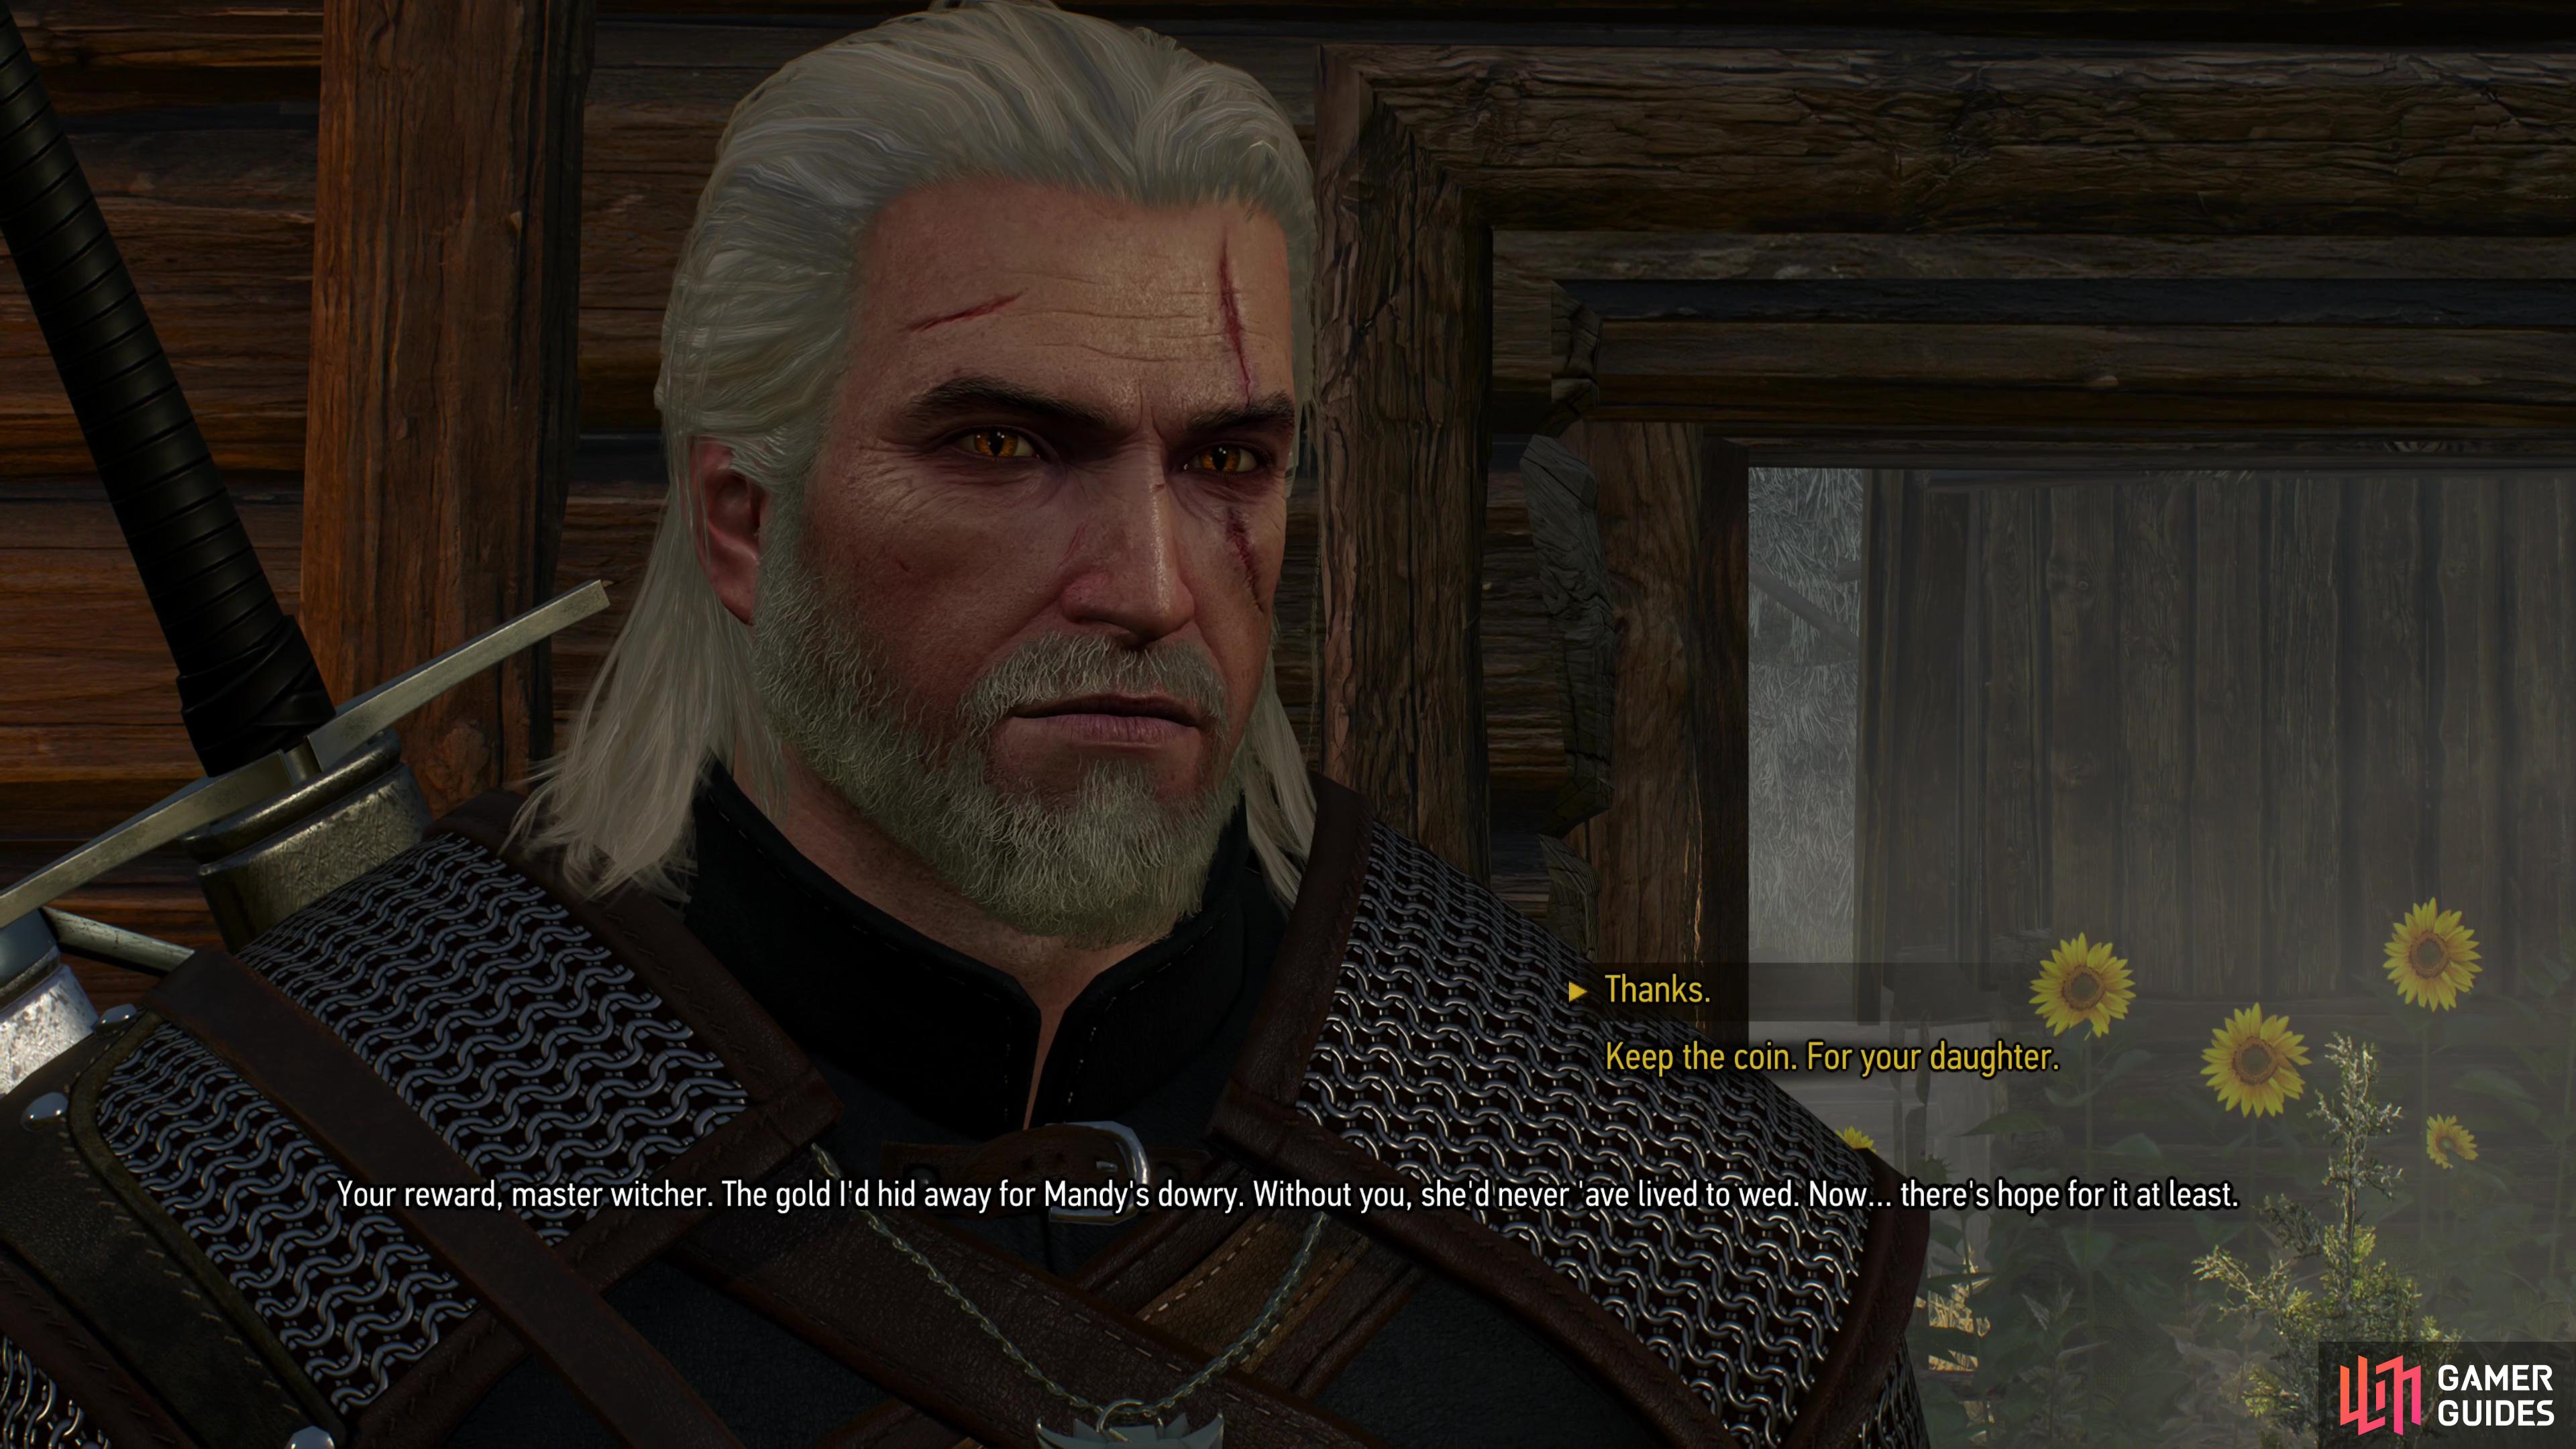
Return to Odolan and tell him the good news, after which you can either claim or refuse the agreed upon reward. Refusing nets you an Amethyst, which is worth more than the coin.
An Amethyst will sell for around 50~ Crowns, or you can pay to have it ground up into Amethyst Dust for use in crafting, and Amethyst Dust will cost you around 200~ Crowns if you have to buy it, so taking the gem is a better deal no matter what you plan to do with it. Plus you get to look like a nice guy afterwards. Win-win. Sometimes, good deeds are rewarded.

 Sign up
No Comments